Friday, April 10, 2020

NiceIncontact API Authentication


Summary

I've authored several posts on the usage of the NiceIncontact (NiC) APIs, but never covered the authentication steps.  This post will show how to do that for both the legacy and new Userhub configuration interfaces.  I'll show a Typescript implementation of the necessary API calls for both API interfaces.

API Access Keys

Legacy Interface

Below is a screenshot of the legacy admin interface of the 3 pieces of information necessary to generate an API bearer token.


Userhub Interface

The newer Userhub interface requires the two pieces of info below to generate the API bearer token.  This access key has been deleted, so there's no security concern here.


API Authentication Class Design

Below is a diagram depicting the Typescript classes that will be used for generating API bearer tokens for the two access types mentioned above.

Code


Authenticator Interface

export interface Authenticator {
    getToken():Promise<string>;
};

Legacy Nic OAuth Class (getToken function)

    async getToken():Promise<string> {
        let body;
        const username = this.credentials ? this.credentials.username : '';
        const password = this.credentials ? this.credentials.password: '';

        switch (this.grant) {
            case GRANT.CLIENT : {
                body = {
                    'grant_type' : 'client_credentials'
                };
                break;
            };
            case GRANT.PASSWORD : {
                body = {
                    'grant_type' : 'password',
                    'username' : username,  
                    'password' : password
                }
                break;
            };
            default : {
                throw new Error('unknown grant type');
            }
        };

        const response = await fetch(this.tokenURL, {
            method: 'POST',
            headers: {
                'Content-Type' : 'application/json', 
                'Authorization' : 'basic ' + this.key
            },
            body: JSON.stringify(body)
        });
    
        if (response.ok) {
            const json = await response.json();
            return json.access_token;
        }
        else {
            throw new Error(`response status: ${response.status} ${response.statusText}`);
        }
    }

Userhub Access Key Class (getToken function)

    async getToken():Promise<string> {
        const body:object = {
            accessKeyId: this.key,
            accessKeySecret: this.secret
        } 
        const response = await fetch(this.url, {
            method: 'POST',
            headers: {
                'Content-Type' : 'application/json'
            },
            body: JSON.stringify(body)
        });
    
        if (response.ok) {
            const json = await response.json();
            return json.access_token;
        }
        else {
            throw new Error(`getToken() response status: ${response.status} ${response.statusText}`);
        }
    
    }

Demo

async function demo():Promise {
    dotenv.config();
    const app:any = process.env.NIC_APP;
    const vendor:any = process.env.NIC_VENDOR;
    const secret:any = process.env.NIC_SECRET;
    const username:any = process.env.NIC_USERNAME;
    const password:any = process.env.NIC_PASSWORD;
    const accessSecret:any = process.env.NIC_ACCESS_SECRET;
    const accessKey:any = process.env.NIC_ACCESS_KEY;
 
    
    let url:string =  'https://api.incontact.com/InContactAuthorizationServer/Token';
    const clientAuth = new NicOAuth(app, vendor, secret, GRANT.CLIENT, url);
    let token:string = await clientAuth.getToken();
    console.log(`client auth token: ${token}`);
    console.log('');

    const credentials = new Credentials(username, password);
    const passwordAuth = new NicOAuth(app, vendor, secret, GRANT.PASSWORD, url, credentials);
    token = await passwordAuth.getToken();
    console.log(`password auth token: ${token}`);
    console.log('');

    url = 'https://na1.nice-incontact.com/authentication/v1/token/access-key';
    const nicAccess = new NicAccess(accessKey, accessSecret, url);
    token = await nicAccess.getToken();
    console.log(`access token: ${token}`);
}

Results

$ npm run start

> authdemo@1.0.0 start nicapiauth
> node authdemo.js

client auth token: eyJ0eXAiOiJKV1QiLCJhbGciOiJSUzI1NiJ9.eyJpY0JVSWQiOjQ1OTM0NDMsIm5hbWUiOiIiLCJpc3...

password auth token: eyJ0eXAiOiJKV1QiLCJhbGciOiJSUzI1NiJ9.eyJpY0JVSWQiOjQ1OTM...

access token: eyJ0eXAiOiJKV1QiLCJhbGciOiJSUzI1NiJ9.ey...

Source

https://github.com/joeywhelan/NiCAuthentication

Copyright ©1993-2024 Joey E Whelan, All rights reserved.

Sunday, March 29, 2020

Priority Queue with Typescript


Summary

This post covers development of a Priority Queue with Typescript.  The queue is implemented via a Binary Heap.  Typescript features such as static type-checking and object-oriented concepts such as classes, interfaces and inheritance are utilized.

Design

Implementation

Queue Item Class

 export class Item {
    priority:number;
    value:object;

    constructor(priority:number, value:object) {
        this.priority = priority;
        this.value = value;
    }
 }

Heap Interface

import {Item} from './item';

export enum Order {MIN, MAX};
export interface Heap {
    insert(item:Item):void;
    extract():Item;
    peek():Item;
    show():void;
    size():number;
};

Binary Heap Class - snippets

export class BinaryHeap implements Heap {
    private order:Order;
    private heap:Item[];

    insert(item:Item):void {
        this.heap.push(item);
        this.siftUp(this.heap.length-1);
    };

    private siftUp(idx:number):void {
        let parent:number;
        let sorted:boolean = false;

        while (!sorted) {
          parent = this.getParent(idx)
          switch (this.order) {
              case Order.MIN: {
                if (this.heap[idx].priority < this.heap[parent].priority) {
                    this.swap(idx, parent);
                    idx = parent;
                }
                else {
                    sorted = true;
                }
                break;
              }
              case Order.MAX: {
                if (this.heap[idx].priority > this.heap[parent].priority) {
                    this.swap(idx, parent);
                    idx = parent;
                }
                else {
                    sorted = true;
                }
                break;
              }
              default: {
                  sorted = true;
                  break;
              }
          }  
        }
    }

Priority Queue Class

export class PriorityQueue {
    heap:BinaryHeap;

    constructor(items:Item[]){
        this.heap = new BinaryHeap(items);
    }

    insert(item:Item):void {
        this.heap.insert(item);
    }

    isEmpty():boolean {
        return this.heap.size() == 0;
    }

    peek():Item {
        return this.heap.peek();
    }

    pull():Item {
        return this.heap.extract();
    }

    show():void {
        this.heap.show();
    }
}

Example


Source

https://github.com/joeywhelan/PriorityQueue

Copyright ©1993-2024 Joey E Whelan, All rights reserved.

Sunday, December 15, 2019

Workflow for moving an existing VS Code project to Github

Summary

This post is a step by step instruction on how to push an existing Visual Studio Code project to Github.  I'll demonstrate steps from both the GUI and command line to accomplish this.

Step 1:  Create the Github Repository

Screen-shot below of a basic repo.  Note that I use Github's stock Node.js .gitignore file.


Resulting repo:


Step 2:  Create a Local Git Repository

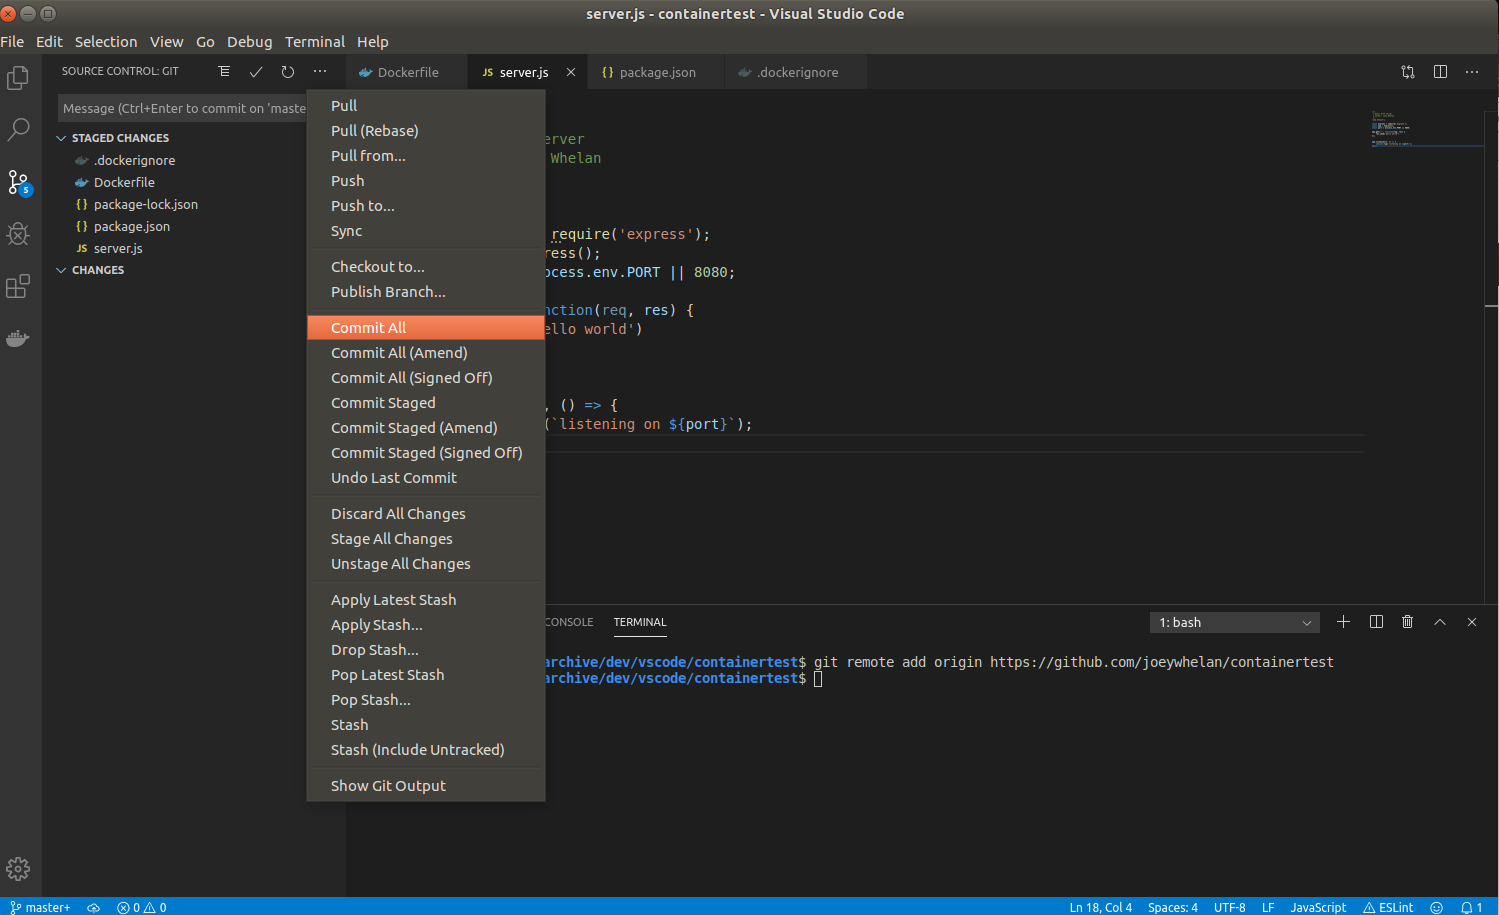
Command-line and GUI methods below:
$ git init .


Step 3:  Add Remote (Github) Repository

git remote add origin https://github.com/joeywhelan/containertest

Step 4:  Pull from Github

This step will pull down the existing files in the start-up repo - most importantly, the .gitignore file.

Command-line + GUI methods:

$ git pull origin main

Result below.  Note all the untracked files from the node_modules directory are now hidden via the .gitignore from Github.


Step 5:  Add all of the local files to the local Git Staging Area

$ git add .

Results:

Step 6:  Commit all to the local Git repo.

$ git commit -m "first commit" .

Results:

Step 7:  Rename the local 'master' branch to main and push local files to Github. 

$ git branch -m master main
$ git push -u origin main

Results:

Copyright ©1993-2024 Joey E Whelan, All rights reserved.

Monday, December 9, 2019

Google Cloud Run Quickstart

Summary

This post is a continuation of the previous quick start on containerizing a Node.js app.  In this post, I'll use the same simple app + Dockerfile and deploy the app to Google's Cloud Run platform.

Cloud Run is an alternate method for server-less app deployments.  Google Cloud Functions is other method.  Whereas Cloud Functions has very specific language requirements, Cloud Run has none.  Whatever you build in a container is fair game.  The only requirement is the app needs to respond to HTTP requests as a trigger.  Cloud Run provides similar auto-scaling capabilities as Cloud Functions making it an excellent choice for a self-managing app deployment.

Step 1:  Create a Google Cloud Project


Step 2:  Enable Cloud Build and Cloud Run APIs


Step 3:  Build the Container

$ gcloud config set project cloudrun-quickstart-261521 
Updated property [core/project].
$ gcloud builds submit --tag gcr.io/cloudrun-quickstart-261521/cloudrun-quickstartCreating temporary tarball archive of 331 file(s) totalling 1.6 MiB before compression.
Uploading tarball of [.] to [gs://cloudrun-quickstart-261521_cloudbuild/source/1575934972.69-7637137b7675474ab861a2f4185529c6.tgz]
Created [https://cloudbuild.googleapis.com/v1/projects/cloudrun-quickstart-261521/builds/7591715a-3e15-4323-b570-0c2dc191fb3a].
Logs are available at [https://console.cloud.google.com/gcr/builds/7591715a-3e15-4323-b570-0c2dc191fb3a?project=945345104488].
...
DONE
--------------------------------------------------------------------------------------------------------------------------------------------

ID                                    CREATE_TIME                DURATION  SOURCE                                                                                                IMAGES                                                           STATUS
7591715a-3e15-4323-b570-0c2dc191fb3a  2019-12-09T23:42:55+00:00  57S       gs://cloudrun-quickstart-261521_cloudbuild/source/1575934972.69-7637137b7675474ab861a2f4185529c6.tgz  gcr.io/cloudrun-quickstart-261521/cloudrun-quickstart (+1 more)  SUCCESS

Step 4:  Deploy to Cloud Run

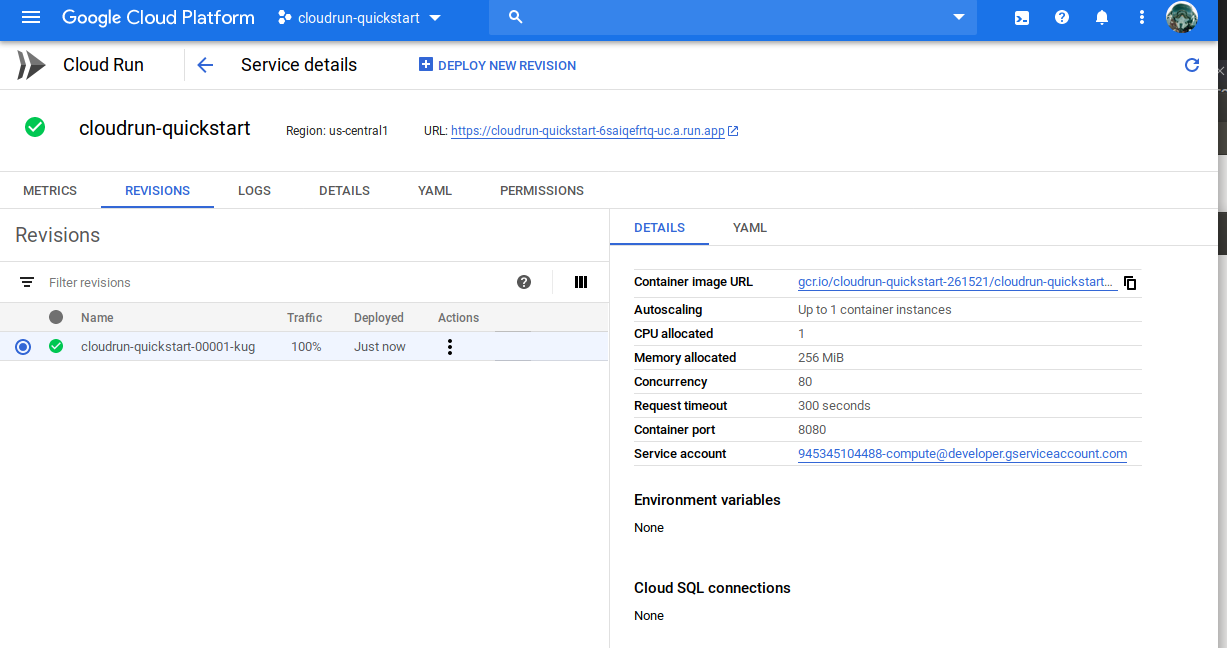
Screen shots below of the Cloud Run console.  Note in the second screen shot the concurrency controls available.  You can specify the number of requests per container and the max container auto-scale growth.


Step 5:  Execute

$ curl -i https://cloudrun-quickstart-6saiqefrtq-uc.a.run.app 
HTTP/2 200 
x-powered-by: Express
content-type: text/html; charset=utf-8
etag: W/"b-Kq5sNclPz7QV2+lfQIuc6R7oRu0"
x-cloud-trace-context: 4f70f43d41086a3d8ea2320a166a5f89;o=1
date: Mon, 09 Dec 2019 23:58:10 GMT
server: Google Frontend
content-length: 11
alt-svc: quic=":443"; ma=2592000; v="46,43",h3-Q050=":443"; ma=2592000,h3-Q049=":443"; ma=2592000,h3-Q048=":443"; ma=2592000,h3-Q046=":443"; ma=2592000,h3-Q043=":443"; ma=2592000

hello world

Step 6:  Clean up

Copyright ©1993-2024 Joey E Whelan, All rights reserved.

Node.js on Docker Quickstart


Summary

This post is a basic primer on getting a Node app containerized.

Step 1:  Create the app

Below is a basic HTTP server implementation using Express.
'use strict';

const express = require('express');
const app = express();
const port = process.env.PORT || 8080;

app.get('/', function(req, res) {
 res.send('hello world')
});

app.listen(port, () => {
    console.log(`listening on ${port}`);
});
Below is the resulting package.json containing the app dependencies. This file is created via the 'npm init' command. 'npm install --save' causes the dependencies to be updated for each module used in the app.
{
  "name": "containertest",
  "version": "1.0.0",
  "description": "simple express server",
  "main": "server.js",
  "repository": "none",
  "scripts": {
    "test": "echo \"Error: no test specified\" && exit 1",
    "start": "node server.js"
  },
  "author": "joey whelan",
  "license": "MIT",
  "dependencies": {
    "express": "^4.17.1"
  }
}

Step 2:  Create the Dockerfile and .dockerignore

Below is the Dockerfile to support the above app.  It's written per best practices to cause the app source code to be added as the last layer to enable caching of modules.
FROM node:lts
WORKDIR /usr/src/app
COPY package*.json ./
RUN npm install
COPY . .
EXPOSE 8080
CMD ["npm", "start"]
.dockerignore below.
node_modules
npm-debug.log

Step 3:  Build the Docker image

$ docker build -t containertest .
Sending build context to Docker daemon  19.97kB
Step 1/7 : FROM node:lts
lts: Pulling from library/node
844c33c7e6ea: Pull complete 
ada5d61ae65d: Pull complete 
f8427fdf4292: Pull complete 
f025bafc4ab8: Pull complete 
7a9577c07934: Pull complete 
9b4289f800f5: Pull complete 
55e3fcab47b9: Pull complete 
c7a94e331913: Pull complete 
bb9efc0c132a: Pull complete 
Digest: sha256:88ee7d2a5e18d359b4b5750ecb50a9b238ab467397c306aeb9955f4f11be44ce
Status: Downloaded newer image for node:lts
 ---> 7be6a8478f5f
Step 2/7 : WORKDIR /usr/src/app
 ---> df2833d84c36
Removing intermediate container 11f00574e18a
Step 3/7 : COPY package*.json ./
 ---> a892506a76df
Removing intermediate container 07fc76863a41
Step 4/7 : RUN npm install
 ---> Running in 7abdbc6d6e64
added 50 packages from 37 contributors and audited 126 packages in 1.197s
found 0 vulnerabilities

 ---> 9ab0afa5e750
Removing intermediate container 7abdbc6d6e64
Step 5/7 : COPY . .
 ---> 39620b323b38
Removing intermediate container f2692a5064a0
Step 6/7 : EXPOSE 8080
 ---> Running in 4e758301eaad
 ---> 076d56510119
Removing intermediate container 4e758301eaad
Step 7/7 : CMD npm start
 ---> Running in 80f1a6be42cc
 ---> c9c55b4ddca7
Removing intermediate container 80f1a6be42cc
Successfully built c9c55b4ddca7
Successfully tagged containertest:latest
Resulting images below:
$ docker images
REPOSITORY          TAG                 IMAGE ID            CREATED             SIZE
containertest       latest              c9c55b4ddca7        3 minutes ago       911MB
node                lts                 7be6a8478f5f        2 weeks ago         908MB

Step 4:  Run the container

$ docker run -p 8080:8080 -d containertest
d8d98f3fff8e752c186f99599ca475682790e3a5645d16705a398404ddf9ec74
Resulting running container below:
$ docker ps
CONTAINER ID        IMAGE               COMMAND                  CREATED             STATUS              PORTS                    NAMES
d8d98f3fff8e        containertest       "docker-entrypoint..."   2 minutes ago       Up 2 minutes        0.0.0.0:8080->8080/tcp   thirsty_dijkstra
Execution of HTTP request against the containerized server below:
$ curl -v localhost:8080/
*   Trying 127.0.0.1...
* TCP_NODELAY set
* Connected to localhost (127.0.0.1) port 8080 (#0)
> GET / HTTP/1.1
> Host: localhost:8080
> User-Agent: curl/7.58.0
> Accept: */*
> 
< HTTP/1.1 200 OK
< X-Powered-By: Express
< Content-Type: text/html; charset=utf-8
< Content-Length: 11
< ETag: W/"b-Kq5sNclPz7QV2+lfQIuc6R7oRu0"
< Date: Mon, 09 Dec 2019 16:44:36 GMT
< Connection: keep-alive
< 
* Connection #0 to host localhost left intact
hello world

Step 5:  Stop the container

Stop command results below.  Note it's possible to abbreviate the container ID.
$ docker stop d8
d8
$ docker ps
CONTAINER ID        IMAGE               COMMAND             CREATED             STATUS              PORTS               NAMES

Step 6:  Clean up

Commands below to delete the container and its image.
$ docker ps -a
CONTAINER ID        IMAGE               COMMAND                  CREATED             STATUS                     PORTS               NAMES
d8d98f3fff8e        containertest       "docker-entrypoint..."   17 minutes ago      Exited (0) 4 minutes ago                       thirsty_dijkstra
$ docker rm d8
d8
$ docker ps -a
CONTAINER ID        IMAGE               COMMAND             CREATED             STATUS              PORTS               NAMES
$ docker images
REPOSITORY          TAG                 IMAGE ID            CREATED             SIZE
containertest       latest              c9c55b4ddca7        26 minutes ago      911MB
node                lts                 7be6a8478f5f        2 weeks ago         908MB
$ docker rmi c9
Untagged: containertest:latest
Deleted: sha256:c9c55b4ddca7aac2d12a93c66ee1adf95b5e2b4b09a7b93aac2e0981b45006be
Deleted: sha256:076d565101195290512b90eba0d25f16a3798db0f1cf49aea4d096e926d03250
Deleted: sha256:39620b323b38b824b8f074183eda49339748f2516a70d19718d821a086826234
Deleted: sha256:20407ee7b27893df082e6fa7eddb9608517d53a930beaf426c37ac2453949714
Deleted: sha256:9ab0afa5e750b610d08ed12258972e8d880d8acdd8b3034bd96add8c5daea705
Deleted: sha256:b972df701627963f9fa4dbb2ef1c20148cdddd8a8922aea6c3ba8e2ceca62c27
Deleted: sha256:a892506a76df6ceaaff88b3fe14ee30de477fc9596cb8236aeeee0b3a0106e76
Deleted: sha256:4fab789311ef158be2b924dcdaa1646802900913e07d645f95adb299ee09c506
Deleted: sha256:df2833d84c365c86e3c5218cc997d3ec958e1e4f68eb47cb82483cbd2a14c738
Deleted: sha256:43dd5d9ada9dc352d7fdf5cd3b179cd0855681851eef378a5c82b3ce682bc17e
$ docker images
REPOSITORY          TAG                 IMAGE ID            CREATED             SIZE
node                lts                 7be6a8478f5f        2 weeks ago         908MB

Copyright ©1993-2024 Joey E Whelan, All rights reserved.

Sunday, October 27, 2019

Trading on Trump's Tweets


Summary

There have been several articles during President Trump's term regarding his use of Twitter and his influence on stock prices.  Below is one such article:

https://fortune.com/2017/02/24/trump-tweet-stocks/ 

This post explores development of a programmatic analysis of Trump's tweets that are focused on publicly traded companies.  I use a variety of APIs to ferret out the tweets of interest and then take action on them.  In this exercise, I simply generate an alert email; however, one could envision automated trading as the action.

This post represents the culmination of the my Twitter API blog series:

Architecture

This is a Node-based architecture that uses various publicly accessible REST APIs.


Processing Logic


Code Excerpt - Tweet Processing

The function below accepts tweet text as input and then sends that text through Google's NL engine for entity analysis. If the top entity, ranked by salience, is an "ORGANIZATION" - then there's a chance the tweet is regarding a company. The next step is to use the IEX Cloud API to determine if the entity does in fact corresponds to a publicly traded company.  If so, then perform full processing of the tweet:  gather further NL + stock analytics and then package them for an email alert.

async function processTweet(tweet) {
    logger.debug(`processTweet()`);
    try {
        const esnt = await entitySentiment(GOOGLE_KEY, ENTITY_SENTIMENT_URL, tweet);

        if (esnt.type === 'ORGANIZATION') { //entity corresponds to a type that might be a company
            let stock;
            if (Array.isArray(symbolArray)) {
                stock = symbolArray.find(obj => {
                    return obj.name.match(esnt.name);
                });
                if (stock) {  //name corresponds to a publicly traded company - fetch full tweet sentiment
                    //and stock data
                    const snt = await sentiment(GOOGLE_KEY, SENTIMENT_URL, tweet);
                    const data = await getStockData(IEX_KEY, STOCK_URL, stock.symbol);

                    let analytics = {};
                    analytics.tweet = tweet;
                    analytics.name = esnt.name;
                    analytics.salience = esnt.salience;
                    analytics.entitySentiment = esnt.entitySentiment;
                    analytics.documentSentiment = snt;
                    let mag = (analytics.entitySentiment.magnitude + analytics.documentSentiment.magnitude) / 2;
                    let score = (analytics.entitySentiment.score + analytics.documentSentiment.score) / 2;
                    analytics.aggregate = mag * score;
                    analytics.symbol = stock.symbol;
                    analytics.data = data;
                    sendEmail(SENDGRID_KEY, SENDGRID_URL, analytics);
                }
            }
        }
    }
    catch(err) {
        logger.error(err);
    }
}

Code Excerpt - Fetch Stock Data

Excerpt below exercises IEX's API to fetch a few simple stock data items.  This API is quite rich.  There is significantly more analytics available that what I've pulled below:  current stock price and previous day's history.

async function getStockData(token, url, symbol) {
    logger.debug(`getStockData() - name:${symbol}`);
    
    let data = {};
    const price = await getPrice(token, url, symbol);
    const previous = await getPrevious(token, url, symbol);
    data.current_price = price;
    data.date = previous.date;
    data.open = previous.open;
    data.close = previous.close;
    data.high = previous.high;
    data.low = previous.low
    return data;
}

Code Excerpt - Test

Test function below submits a tweet President Trump unleashed on Harley-Davidson on June 25, 2018.
async function test() {
    symbolArray = await getSymbols(IEX_KEY, SYMBOL_URL);
    const tweet1 = "Surprised that Harley-Davidson, of all companies, would be the first to wave the White Flag. I
fought hard for them and ultimately they will not pay tariffs selling into the E.U., 
which has hurt us badly on trade, down $151 Billion. Taxes just a Harley excuse - be patient!";
    await processTweet(tweet1);
}

test()
.then(() => {
    console.log('complete');
});

Results

Excerpt below of the raw email text that was generated.

Date: Sun, 27 Oct 2019 17:54:52 +0000 (UTC)
From: twitterTrade@example.com
Mime-Version: 1.0
To: joey.whelan@gmail.com
Message-ID: 
Content-type: multipart/alternative; boundary="----------=_1572198892-24558-282"
Subject: Twitter Trade Alert - Negative Tweet: Harley-Davidson

{
    "tweet": "Surprised that Harley-Davidson, of all companies, would be th=
e first to wave the White Flag. I fought hard for them and ultimately they =
will not pay tariffs selling into the E.U., which has hurt us badly on trad=
e, down $151 Billion. Taxes just a Harley excuse - be patient!",
    "name": "Harley-Davidson",
    "salience": 0.35687405,
    "entitySentiment": {
        "magnitude": 0.4,
        "score": 0
    },
    "documentSentiment": {
        "magnitude": 0.9,
        "score": -0.1
    },
    "aggregate": -0.0325,
    "symbol": "HOG",
    "data": {
        "current_price": 39.39,
        "date": "2019-10-25",
        "open": 38.64,
        "close": 39.39,
        "high": 39.69,
        "low": 38.64
    }
}

Source

https://github.com/joeywhelan/twitterTrade

Copyright ©1993-2024 Joey E Whelan, All rights reserved.

Thursday, October 24, 2019

Twitter Filtered Stream


Summary

This post discusses my use of  Twitter Developer Labs (beta) APIs for creating a real-time tweet feed.  The APIs are all HTTP-based.  The actual streaming tweet feed is a HTTP connection that, in theory, never ends.

Architecture

The diagram below depicts the overall flow for this exercise.
  • An API token has to be fetched to call any of the Twitter APIs.
  • Fetch any existing tweet filter rules
  • Delete them
  • Add new filtering rules
  • Start streaming a tweet feed based on those filtering rules


Fetch API Token

I discussed the steps for that in this post.

Get Existing Filter Rules

The code below fetches any existing filtering rules in place for the given account associated with the bearer token.

const RULES_URL  = 'https://api.twitter.com/labs/1/tweets/stream/filter/rules';
async function getRules(token, url) {
    console.debug(`${(new Date()).toISOString()} getRules()`);
    
    try {
        const response = await fetch(url, {
            method: 'GET',
            headers: {
            'Authorization' : 'Bearer ' + token
            }
        });
        if (response.ok) {
            const json = await response.json();
            return json;
        }
        else {
            throw new Error(`response status: ${response.status} ${response.statusText}`);    
        }
    }
    catch (err) {
        console.error(`${(new Date()).toISOString()} getRules() - ${err}`);
        throw err;
    }
}

Delete Existing Filter Rules

Passing an array of filter IDs, delete that array from Twitter for the account associated with the bear token.

async function deleteRules(token, ids, url) {
    console.debug(`${(new Date()).toISOString()} deleteRules()`);
 
    const body = {
        'delete' : {
            'ids': ids
        }
    };
    try {
        const response = await fetch(url, {
            method: 'POST',
            headers: {
                'Content-Type' : 'application/json',
                'Authorization' : 'Bearer ' + token
            },
            body: JSON.stringify(body)
        });
        if (response.ok) {
            const json = await response.json();
            return json.meta.summary.deleted;
        }
        else {
            throw new Error(`response status: ${response.status} ${response.statusText}`);    
        }
    }
    catch (err) {
        console.error(`${(new Date()).toISOString()} deleteRules() - ${err}`);
        throw err;
    }
}

Add New Filtering Rules

The code below adds an array of filtering rules to a given account.  Example array with a single rule below.  That rule targets tweets from the President and filters out any retweets or quotes.
const RULES = [{'value' : 'from:realDonaldTrump -is:retweet -is:quote'}];
async function setRules(token, rules, url) {
    console.debug(`${(new Date()).toISOString()} setRules()`);
 
    const body = {'add' : rules};
    try {
        const response = await fetch(url, {
            method: 'POST',
            headers: {
                'Content-Type'  : 'application/json',
                'Authorization' : 'Bearer ' + token
            },
            body: JSON.stringify(body)
        });
        if (response.ok) {
            const json = await response.json();
            return json.meta.summary.created;
        }
        else {
            throw new Error(`response status: ${response.status} ${response.statusText}`);    
        }
    }
    catch (err) {
        console.error(`${(new Date()).toISOString()} setRules() - ${err}`);
        throw err;
    }
}

Stream Tweets

Below is an excerpt of the main streaming logic.  A link to the full source repo is at the bottom of this blog.  This excerpt follows happy path of a HTTP 200 response and starts up a theoretically never-ending reader stream to Twitter with tweets that match the filter criteria built up previously.  Twitter sends heartbeats on this connection every 20 seconds.
                g_reader = response.body;
                g_reader.on('data', (chunk) => {
                    try {
                        const json = JSON.parse(chunk);
                        let text = json.data.text.replace(/\r?\n|\r|@|#/g, ' ');  //remove newlines, @ and # from tweet text
                        console.log(`${(new Date()).toISOString()} tweet: ${text}`);
                    }
                    catch (err) {
                        //heartbeat will generate a json parse error.  No action necessary; continue to read the stream.
                        console.debug(`${(new Date()).toISOString()} stream() - heartbeat received`);
                    } 
                    finally {
                        g_backoff = 0;
                        clearTimeout(abortTimer);
                        abortTimer = setTimeout(() => { controller.abort(); }, ABORT_TIMEOUT * 1000);
                    } 
                });

Results

2019-10-24T14:01:01.906Z filter()
2019-10-24T14:01:01.909Z getTwitterToken()
2019-10-24T14:01:02.166Z clearAllRules()
2019-10-24T14:01:02.166Z getRules()
2019-10-24T14:01:02.353Z deleteRules()
2019-10-24T14:01:02.604Z number of rules deleted: 1
2019-10-24T14:01:02.605Z setRules()
2019-10-24T14:01:02.902Z number of rules added: 1
2019-10-24T14:01:02.903Z stream()
2019-10-24T14:01:03.179Z stream() - 200 response
2019-10-24T14:01:23.177Z stream() - heartbeat received
...
2019-10-24T14:20:03.657Z stream() - heartbeat received
2019-10-24T14:20:12.959Z tweet: The Federal Reserve is derelict in its duties if it 
doesn’t lower the Rate and even, ideally, stimulate. Take a look around the World at our 
competitors. Germany and others are  actually GETTING PAID to borrow money. Fed was way too 
fast to raise, and way too slow to cut!
2019-10-24T14:20:23.660Z stream() - heartbeat received

Source

https://github.com/joeywhelan/twitterFilter

Copyright ©1993-2024 Joey E Whelan, All rights reserved.