Friday, December 5, 2014

SIP Digest Authentication in Cisco IOS


Summary

Digest authentication is one method for negotiating credentials in an HTTP environment.  The method is also supported for SIP.  In this post, I'm going to demonstrate how to configure Digest Authentication for a SIP trunk against a Cisco gateway.  The particular SIP service provider (Twilio) utilized here uses Digest auth in conjunction with ACL's to secure access to their SIP trunk product.

Environment

Figure 1 depicts the physical environment I've used for this exercise.  A SIP trunk is provisioned with the SIP Service Provider (SP) and configured on a Cisco router.  The trunk connection is across the Internet.  HTTP Digest Auth is configured on the router to authenticate to the SIP SP.

Figure 1

Figure 2 is a simplified (caller to SP SIP messaging only) ladder diagram for a digest auth call flow.  

Figure 2

Implementation

Configure Digest Auth Parameters

router(config)#sip-ua
router(config-sip-ua)#authentication username yourname password yourpassword1234567 realm sip.twilio.com

Line 1:  Makes this a global configuration.  You can also configure the digest parameters on a per dial-peer basis.
Line 2:  Establishes the username, password, and realm parameters relevant to this provider's SIP trunk.

Configure Dial Peer for SIP Trunk SP

dial-peer voice 160 voip
 translation-profile outgoing adde164
 destination-pattern 9*.T
 session protocol sipv2
 session target dns:yourname.pstn.twilio.com
 dtmf-relay rtp-nte digit-drop
 codec g711ulaw

Fairly standard dial-peer configuration above.  This particular SP requires phone numbers to be e.164 formatted, so I created a translation rule for that.

SIP Messaging

Below is the resulting successful message exchange between the Cisco gateway and this provider (debug ccsip messages) with the 407/new INVITE handshake highlighted.

Dec  5 17:39:50: //284/8408FCBA8359/SIP/Msg/ccsipDisplayMsg:
Sent: 
INVITE sip:+18001234567@yourname.pstn.twilio.com:5060 SIP/2.0
Via: SIP/2.0/UDP X.X.X.X:5060;branch=z9hG4bK11D19D0
Remote-Party-ID: <sip:1234567890@X.X.X.X>;party=calling;screen=no;privacy=off
From: <sip:1234567890@X.X.X.X>;tag=655DFE64-B2A
To: <sip:+18001234567@yourname.pstn.twilio.com>
Date: Fri, 05 Dec 2014 17:39:50 GMT
Call-ID: 8C0B2A64-7BDC11E4-835EED1E-7210D108@X.X.X.X
Supported: 100rel,timer,resource-priority,replaces,sdp-anat
Min-SE:  1800
Cisco-Guid: 2215181498-2078020068-2203708702-1913704712
User-Agent: Cisco-SIPGateway/IOS-15.2.4.M7
Allow: INVITE, OPTIONS, BYE, CANCEL, ACK, PRACK, UPDATE, REFER, SUBSCRIBE, NOTIFY, INFO, REGISTER
CSeq: 101 INVITE
Max-Forwards: 70
Timestamp: 1417801190
Contact: <sip:1234567890@X.X.X.X:5060>
Expires: 180
Allow-Events: telephone-event
Content-Type: application/sdp
Content-Disposition: session;handling=required
Content-Length: 274

v=0
o=CiscoSystemsSIP-GW-UserAgent 3449 1377 IN IP4 X.X.X.X
s=SIP Call
c=IN IP4 X.X.X.X
t=0 0
m=audio 16666 RTP/AVP 0 101 19
c=IN IP4 X.X.X.X
a=rtpmap:0 PCMU/8000
a=rtpmap:101 telephone-event/8000
a=fmtp:101 0-16
a=rtpmap:19 CN/8000
a=ptime:20

Dec  5 17:39:50: //284/8408FCBA8359/SIP/Msg/ccsipDisplayMsg:
Received: 
SIP/2.0 100 Giving a try
Via: SIP/2.0/UDP X.X.X.X:5060;branch=z9hG4bK11D19D0
From: <sip:1234567890@X.X.X.X>;tag=655DFE64-B2A
To: <sip:+18001234567@yourname.pstn.twilio.com>
Call-ID: 8C0B2A64-7BDC11E4-835EED1E-7210D108@X.X.X.X
CSeq: 101 INVITE
Server: Twilio Gateway
Content-Length: 0


Dec  5 17:39:50: //284/8408FCBA8359/SIP/Msg/ccsipDisplayMsg:
Received: 
SIP/2.0 407 Proxy Authentication required
To: <sip:+18001234567@yourname.pstn.twilio.com>;tag=65078573_6772d868_96d511db-e153-44f1-a2b8-d857b1388a10
Timestamp: 1417801190
Via: SIP/2.0/UDP X.X.X.X:5060;branch=z9hG4bK11D19D0
CSeq: 101 INVITE
Call-ID: 8C0B2A64-7BDC11E4-835EED1E-7210D108@X.X.X.X
From: <sip:1234567890@X.X.X.X>;tag=655DFE64-B2A
Contact: <sip:172.18.0.224:5060>
Proxy-Authenticate: Digest realm="sip.twilio.com",qop="auth",nonce="559389cd4b456fe70b70959fd9b16c9e",opaque="1a6d40a6ea756edc34b787452d0f36fe"
Content-Length: 0


Dec  5 17:39:50: //284/8408FCBA8359/SIP/Msg/ccsipDisplayMsg:
Sent: 
ACK sip:+18001234567@yourname.pstn.twilio.com:5060 SIP/2.0
Via: SIP/2.0/UDP X.X.X.X:5060;branch=z9hG4bK11D19D0
From: <sip:1234567890@X.X.X.X>;tag=655DFE64-B2A
To: <sip:+18001234567@yourname.pstn.twilio.com>;tag=65078573_6772d868_96d511db-e153-44f1-a2b8-d857b1388a10
Date: Fri, 05 Dec 2014 17:39:50 GMT
Call-ID: 8C0B2A64-7BDC11E4-835EED1E-7210D108@X.X.X.X
Max-Forwards: 70
CSeq: 101 ACK
Allow-Events: telephone-event
Content-Length: 0


Dec  5 17:39:50: //284/8408FCBA8359/SIP/Msg/ccsipDisplayMsg:
Sent: 
INVITE sip:+18001234567@yourname.pstn.twilio.com:5060 SIP/2.0
Via: SIP/2.0/UDP X.X.X.X:5060;branch=z9hG4bK11E173
Remote-Party-ID: <sip:1234567890@X.X.X.X>;party=calling;screen=no;privacy=off
From: <sip:1234567890@X.X.X.X>;tag=655DFE64-B2A
To: <sip:+18001234567@yourname.pstn.twilio.com>
Date: Fri, 05 Dec 2014 17:39:50 GMT
Call-ID: 8C0B2A64-7BDC11E4-835EED1E-7210D108@X.X.X.X
Supported: 100rel,timer,resource-priority,replaces,sdp-anat
Min-SE:  1800
Cisco-Guid: 2215181498-2078020068-2203708702-1913704712
User-Agent: Cisco-SIPGateway/IOS-15.2.4.M7
Allow: INVITE, OPTIONS, BYE, CANCEL, ACK, PRACK, UPDATE, REFER, SUBSCRIBE, NOTIFY, INFO, REGISTER
CSeq: 102 INVITE
Max-Forwards: 70
Timestamp: 1417801190
Contact: <sip:1234567890@X.X.X.X:5060>
Expires: 180
Allow-Events: telephone-event
Proxy-Authorization: Digest username="yourname",realm="sip.twilio.com",uri="sip:+18001234567@yourname.pstn.twilio.com:5060",response="0a8ba46efb08ac3a85d5514b1d541393",nonce="559389cd4b456fe70b70959fd9b16c9e",opaque="1a6d40a6ea756edc34b787452d0f36fe",cnonce="0347557B",qop=auth,algorithm=md5,nc=00000001
Content-Type: application/sdp
Content-Disposition: session;handling=required
Content-Length: 274

v=0
o=CiscoSystemsSIP-GW-UserAgent 3449 1377 IN IP4 X.X.X.X
s=SIP Call
c=IN IP4 X.X.X.X
t=0 0
m=audio 16666 RTP/AVP 0 101 19
c=IN IP4 X.X.X.X
a=rtpmap:0 PCMU/8000
a=rtpmap:101 telephone-event/8000
a=fmtp:101 0-16
a=rtpmap:19 CN/8000
a=ptime:20

Dec  5 17:39:50: //284/8408FCBA8359/SIP/Msg/ccsipDisplayMsg:
Received: 

SIP/2.0 100 Giving a try
Via: SIP/2.0/UDP X.X.X.X:5060;branch=z9hG4bK11E173
From: <sip:1234567890@X.X.X.X>;tag=655DFE64-B2A
To: <sip:+18001234567@yourname.pstn.twilio.com>
Call-ID: 8C0B2A64-7BDC11E4-835EED1E-7210D108@X.X.X.X
CSeq: 102 INVITE
Server: Twilio Gateway
Content-Length: 0


Dec  5 17:39:52: //284/8408FCBA8359/SIP/Msg/ccsipDisplayMsg:
Received: 
SIP/2.0 183 Session progress
To: <sip:+18001234567@yourname.pstn.twilio.com>;tag=56440050_6772d868_6c0350d8-3472-4d54-b30d-aafcebaf0605
Timestamp: 1417801190
Via: SIP/2.0/UDP X.X.X.X:5060;branch=z9hG4bK11E173
Record-Route: <sip:54.84.237.137:5060;lr;ftag=655DFE64-B2A>
CSeq: 102 INVITE
Call-ID: 8C0B2A64-7BDC11E4-835EED1E-7210D108@X.X.X.X
From: <sip:1234567890@X.X.X.X>;tag=655DFE64-B2A
Contact: <sip:172.18.16.165:5060>
Content-Type: application/sdp
X-Twilio-CallSid: CA64fa8633f28286b7946a7fca8891e8e8
Content-Length: 240

v=0
o=- 1737312510 1737312510 IN IP4 54.173.13.104
s=SIP Media Capabilities
c=IN IP4 54.173.13.104
t=0 0
m=audio 14350 RTP/AVP 0 101
a=rtpmap:0 PCMU/8000
a=rtpmap:101 telephone-event/8000
a=fmtp:101 0-15
a=sendrecv
a=maxptime:20


Dec  5 17:39:52: //284/8408FCBA8359/SIP/Msg/ccsipDisplayMsg:
Received: 
SIP/2.0 200 OK
To: <sip:+18001234567@yourname.pstn.twilio.com>;tag=56440050_6772d868_6c0350d8-3472-4d54-b30d-aafcebaf0605
Timestamp: 1417801190
Via: SIP/2.0/UDP X.X.X.X:5060;branch=z9hG4bK11E173
Record-Route: <sip:54.84.237.137:5060;lr;ftag=655DFE64-B2A>
CSeq: 102 INVITE
Call-ID: 8C0B2A64-7BDC11E4-835EED1E-7210D108@X.X.X.X
From: <sip:1234567890@X.X.X.X>;tag=655DFE64-B2A
Contact: <sip:172.18.16.165:5060>
Content-Type: application/sdp
X-Twilio-CallSid: CA64fa8633f28286b7946a7fca8891e8e8
Content-Length: 240

v=0
o=- 1489146381 1489146381 IN IP4 54.173.13.104
s=SIP Media Capabilities
c=IN IP4 54.173.13.104
t=0 0
m=audio 14350 RTP/AVP 0 101
a=rtpmap:0 PCMU/8000
a=rtpmap:101 telephone-event/8000
a=fmtp:101 0-15
a=sendrecv
a=maxptime:20

Dec  5 17:39:52: //284/8408FCBA8359/SIP/Msg/ccsipDisplayMsg:
Sent: 
ACK sip:172.18.16.165:5060 SIP/2.0
Via: SIP/2.0/UDP X.X.X.X:5060;branch=z9hG4bK11F655
From: <sip:1234567890@X.X.X.X>;tag=655DFE64-B2A
To: <sip:+18001234567@yourname.pstn.twilio.com>;tag=56440050_6772d868_6c0350d8-3472-4d54-b30d-aafcebaf0605
Date: Fri, 05 Dec 2014 17:39:50 GMT
Call-ID: 8C0B2A64-7BDC11E4-835EED1E-7210D108@X.X.X.X
Route: <sip:54.84.237.137:5060;lr;ftag=655DFE64-B2A>
Max-Forwards: 70
CSeq: 102 ACK
Proxy-Authorization: Digest username="yourname",realm="sip.twilio.com",
uri="sip:+18001234567@yourname.pstn.twilio.com:5060",response="0a8ba46efb08ac3a85d5514b1d541393",nonce="559389cd4b456fe70b70959fd9b16c9e",opaque="1a6d40a6ea756edc34b787452d0f36fe",cnonce="0347557B",qop=auth,algorithm=md5,nc=00000001
Allow-Events: telephone-event
Content-Length: 0


Copyright ©1993-2024 Joey E Whelan, All rights reserved.

Monday, November 17, 2014

Cisco IOS Layer 3 EtherChannel and Jumbo Frames

Summary

In this post I'll be explaining how to create a Layer 3 EtherChannel on a Cisco IOS-based, multilayer switch.  The EtherChannel will provide Layer 3 load balancing for network attached storage (NAS) in a multi-segmented (VLAN's) network environment.  Additionally, I'll show how to enable Ethernet jumbo frames for the NAS.

Environment

Figure 1 below depicts an example LAN environment.  The LAN is segmented into multiple VLAN's and terminated into a multilayer switch.  An EtherChannel is created for a NAS to provide link redundancy and additional through-put for mixed traffic.  As a reminder, EtherChannel does not increase available bandwidth for a single host.

Figure 1

Implementation


Create a Port Channel Interface

1:  interface Port-channel1  
2:   no switchport  
3:   ip address 192.168.7.1 255.255.255.0  

Line 1:  Creates a logical port-channel interface.
Line 2:  The port-channel needs to be specified as a non-switched interface (Layer 3).  Any physical interfaces in the port-channel also need to be non-switched.
Line 3:  Assigns an IP address to the interface.  That address cannot overlap with any existing network segments.

Assign Physical Interfaces to the Port-Channel

1:  interface GigabitEthernet0/17  
2:   no switchport  
3:   no ip address  
4:   channel-group 1 mode active  
5:  !  
6:  interface GigabitEthernet0/18  
7:   no switchport  
8:   no ip address  
9:   channel-group 1 mode active  

Lines 1 & 6:  Two gigabit Ethernet interfaces are selected for the EtherChannel.
Lines 2 & 7:  As mentioned previously, these need to be specified as non-switched interfaces.
Lines 3 & 8:  No Layer 3 address is assigned to these either.
Lines 4 & 9:  Assign each interface to the port-channel number (1 in this case).  The 'active' command indicates the interfaces will actively negotiate LACP.

Configure Load Balancing

IOS provides six different load balancing algorithms for EtherChannel.  All of them consist of hashing a source or destination MAC or IP address to one of the channel members.  The command below XOR's the source and destination IP addresses for that hash calculation.

 port-channel load-balance src-dst-ip  

Configure Routing

Now to be able to reach the NAS, you'll need to assign the port-channel IP address as the default gateway on the NAS.  Additionally, you'll need to configure a route for the NAS/port-channel segment to enable access outside of the LAN.

Configure Jumbo Frames

For 3500 series switches, MTU sizing is set globally.  Other models allow per-interface configuration.

1:  switch(config)#system mtu jumbo 9000  
2:  switch(config)#system mtu routing 9000  

Line 1:  Sets the jumbo frame size to 9000 bytes.  If you're using Layer 2 only for your EtherChannel, this setting is all that is required for jumbo frame support.
Line 2:  Sets the Layer 3 max MTU size to 9000 bytes.  This is necessary given Layer 3 is being used for this EtherChannel example.

A switch reboot will be required before these new MTU sizes take effect.

You can display the resulting MTU sizes with the command below:

 switch#show system mtu  
 System MTU size is 1500 bytes  
 System Jumbo MTU size is 9000 bytes  
 System Alternate MTU size is 1500 bytes  
 Routing MTU size is 9000 bytes  

Copyright ©1993-2024 Joey E Whelan, All rights reserved.

Sunday, November 16, 2014

CIFS/SMB Forwarding - Cisco IOS Helper (Fix for VLANs/Subnets with a WDTV Media Player)

Summary

Cisco IOS provides a mechanism to forward UDP broadcasts from one interface to another.  This is typically used for forwarding DHCP requests, but comes in handy with some media players as well for accessing non-local network shares.  

For example, the Western Digital media player (WDTV) is 'challenged' with accessing network shares in a subnet'ed environment.  For both CIFS (SMB) and NFS, that media player provides no mechanism in its GUI to specify the IP address of the CIFS/NFS server.  Instead, it expects that server to be on the same subnet as the media player.  For CIFS, it will send a NETBIOS broadcast (port 137) on the media player's subnet.  By default,  broadcasts aren't propagated across VLAN's. The IOS helper functionality can be utilized to allow the media player to access CIFS shares on non-local subnets.

Implementation

It's pretty darn simple:  just specify the ip address of your network storage server as a 'helper' on the interface that would receive the broadcast from the media player.  On a router, that's likely a trunk interface to the Layer-2 switch where the media player is connected.  On a multi-layer switch, it could be a SVI for the VLAN containing the media player. 

Example: SVI IP Helper

interface Vlan9
 ip address 192.168.9.1 255.255.255.0
 ip helper-address 192.168.7.3

By default, the ip helper command forwards UDP broadcasts for a half dozen or so protocols (appears to be different for different IOS revs).  Examples of default forwarded protocols:  BOOTP (DHCP), NetBIOS, DNS.  If all you want forwarded are the NetBIOS name service broadcasts (port 137, which is all you need to get CIFS operational), you can turn off forwarding of the others.

Example:  Turn off Forwarding of DNS


no ip forward-protocol udp domain
Copyright ©1993-2024 Joey E Whelan, All rights reserved.

Sunday, October 26, 2014

Cisco IOS VoIP QOS on ADSL

Summary

This article describes how to configure a Cisco router with an ADSL interface to provide prioritization of voice (Quality of Service - QOS).  I'll be classifying voice packets and then placing them into a low latency queue (LLQ).  Everything else (generic data) will be placed into flow-based fair queues.  Additionally, I'll configure Random End Detection (WRED) for the generic TCP traffic.


Environment

Figure 1 depicts the system I'll be configuring.  General data and voice traffic are passing through a Cisco router with an ADSL interface.  An ADSL service provider passes that traffic on the Internet or PSTN.  

Note that while it's possible to configure QOS for voice traffic within your router environment, once that traffic leaves your router - there is no QOS.  Unless your service provider honors QOS markings (highly doubtful), your traffic (voice and data) is being handled as best-effort only.  On a positive note, properly configuring queuing alone on your local router does make a significant positive impact on voice quality.

Figure 1

Implementation

Figure 2 provides a logical picture of what I'll be configuring in Cisco IOS.
Figure 2
Configuring QOS in Cisco IOS can be broken down into the following series of steps:  Classify, Mark, Queue, Shape, and finally apply the policy to an interface.  For simplicity's sake, I'm not going to show any Mark configurations here (also as previously mentioned, your ISP likely ignores/overwrites any markings you make to packets).

Classification


1
2
3
4
class-map match-any voip-class
 match protocol rtp
 match protocol rtcp
 match protocol sip

Line 1 creates a class-map named 'voip-class'.  Any matching condition below it causes the entire class to be matched.
Lines 2-3 are the conditions to be matched.  I'm using the Cisco NBAR engine to classify RTP, RTCP, or SIP signalling traffic.  Any traffic of these types needs to be prioritized.

Queuing


1
2
3
4
5
6
policy-map wan-queue-policy
 class voip-class
  priority 180
 class class-default
  fair-queue
  random-detect


Line 1 creates a policy-map named 'wan-queue-policy'.
Lines 2 and 4 define the two traffic classes this policy will apply to.  I defined the 'voip-class' above.  All other traffic that doesn't match that voip class is thrown into the default class.
Line 3 creates a low latency queue for the voip class.  180 kbps is allocated/guaranteed for that queue.
Lines 5 and 6 configure flow-based queuing for all other traffic.  Additionally, WRED is provided for the TCP traffic in this class.

Shaping


1
2
3
4
policy-map wan-shape-policy
 class class-default
  shape average 896000 8960
   service-policy wan-queue-policy


Line 1 creates another policy-map named 'wan-shape-policy'
Line 2 defines the only traffic class within this policy, a default class.
Line 3 defines the traffic shaping parameters.  In this case, I'm shaping to 896 kbps.  You would set this parameter to be equal to whatever upload bandwidth your ISP is providing.  The following IOS command will list the download and upload speeds on your ADSL link.


router#show dsl int <your adsl/atm int>

Finally, Line 4 applies the previously defined queuing policy to this shaping policy.


Apply the Policy to an Interface

This is where everything can wrong.  Applying this policy to the Dialer interface (a logical interface) on your ADSL interface will NOT work.  If you monitor traffic passing through the policy-map you will in fact see class counters incrementing; however, no queuing/shaping is happening.  You must apply the shaping policy-map to the ADSL hardware interface (specifically, the ATM PVC).


1
2
3
4
5
6
7
interface <your int>
 no ip address
 no atm ilmi-keepalive
 pvc 0/32 
  vbr-rt 896 896
  tx-ring-limit 3
  service-policy out wan-shape-policy


All the action happens starting at Line 4, the PVC.
Line 5 defines an ATM service category (variable bit rate real-time).  I allocated 896 kbps for this traffic class.  The documentation on configuring the parameters (SBR, PBR) for 'vbr-rt' command is somewhat sketchy.  I saw discussions of using the max upload bandwidth as the input for these parameters, but I'm open to other suggestions if they provide reasonable justification.
Line 6 decreases the length of hardware transmit buffer for this interface.  From what I can gather from the Cisco documentation, this is a best practice.  That buffer is 60 wide by default.  Shortening it decreases the latency for the hardware to put the ATM cell on the wire, which is a good thing for voice.  However, nothing is free.  Shortening the buffer will increase CPU usage (more interrupts) on a high-speed link.  This isn't a high-speed link.
Finally, Line 7 applies the shaping policy to the interface.  I apply it in the outbound direction as that is where queuing and shaping needs to happen to alleviate congestion.

You can monitor the policy in real-time with the following command:


router#show policy-map int <your adsl/atm int>
Copyright ©1993-2024 Joey E Whelan, All rights reserved.

Sunday, September 28, 2014

CTI with Node + Redis

Summary

In this article I'll be discussing a way to implement call data passing between disparate telephony systems, i.e., Computer Telephony Integration (CTI).  The techniques I employ in this article (DNIS pooling, database storage of call data, etc) are nothing groundbreaking.  In fact, these techniques are as old as the hills (well, maybe not that old).  What will be new here is the use of current software architectures such as REST with highly-efficient run-time environments such as Node.js and Redis to realize an open data integration between 3rd party systems.

This article is the culmination of a series I've written on this topic.  In Part 1, REST calls from Genesys Routing Strategies, I discussed how to make REST web service calls from one particular vendor's CTI system (Genesys).  In Part 2, VXML and REST Web Services, I discussed REST web service execution from VXML applications.

I'll be leveraging information in this article that I've presented in the following previous articles:

Node/Basic Auth - HTTP Basic Auth on Node.js

Implementation

Figure 1 below depicts the overall architecture.  The 'RAM Cache' component is the focus of this article.  The overall use-case of that cache is to provide 3rd Party telephony systems, with proprietary-only integrations, an open standard method for passing call data between them.  Example:  call that is transferred between two disparate systems.  It would be preferable to retain any data that was gathered by the transferer and pass it to the transferee.

Figure 1

Figure 2 depicts the details of the transfer scenario mentioned above.  A caller calls Telephony System X, during the call System X gathers various pieces of information relevant to the caller, then System X transfers the call to System Y.  The RAM Cache provides the mechanism for call and data matching on that transfer.  The RAM Cache provides a target DNIS, from a pool of numbers assigned to System Y, for System X to transfer the call.  Additionally, the RAM Cache stores any caller data under a DB key that is the combination of the target DNIS and caller's ANI.  The combination of the two provides some additional protection from call/data collisions vs. systems based on either DNIS  or ANI alone.  System Y can subsequently match the call and data upon receipt of the transfer.

Figure 2

The RAM Cache architecture itself is depicted in Figure 3.  The Node runtime with various modules are utilized to implement: a.  HTTP server that provides the REST interface and b.  a client to the Redis database.  A static configuration file is utilized for all server information.  Redis provides a key/value store for the DNIS:ANI-keyed values.  Additionally, by configuring key expirations in Redis we can implement automatic expulsion of stale key/values.

Figure 3
Figure 4 depicts the REST interface I implemented here.  POST's insert data into the store (Create).  GET's fetch data from the store (Retrieve).  DELETE's both fetch the data and cause it to be deleted from the store (Delete).

Figure 4

Example Use

Below are some cURL examples on use of the REST interface.

POST


curl --user "username:password" -v -i -H "Content-Type:application/json" -X POST -d '{"value" : "12345678", "ani" : "1234567890"}' https://yourDomain.com/cticache/DNIS-ANI


HTTP/1.1 201 Created
< X-Powered-By: Express
X-Powered-By: Express
< Location: /cticache/DNIS-ANI/5551234568:1234567890
Location: /cticache/DNIS-ANI/5551234568:1234567890
< Content-Type: application/json; charset=utf-8
Content-Type: application/json; charset=utf-8
< Content-Length: 59
Content-Length: 59
< Date: Mon, 29 Sep 2014 00:19:53 GMT
Date: Mon, 29 Sep 2014 00:19:53 GMT
< Connection: keep-alive
Connection: keep-alive

* Connection #0 to host yourDomain.com left intact
{"dnis":"5551234568","ani":"1234567890","value":"12345678"}


GET


curl --user "username:password" -v -i https://yourDomain.com/cticache/DNIS-ANI/5551234568:1234567890


HTTP/1.1 200 OK
< X-Powered-By: Express
X-Powered-By: Express
< Content-Type: application/json; charset=utf-8
Content-Type: application/json; charset=utf-8
< Content-Length: 20
Content-Length: 20
< ETag: W/"14-2814665325"
ETag: W/"14-2814665325"
< Date: Mon, 29 Sep 2014 00:24:14 GMT
Date: Mon, 29 Sep 2014 00:24:14 GMT
< Connection: keep-alive
Connection: keep-alive

* Connection #0 to host yourDomain.com left intact
{"value":"12345678"}


DELETE


curl --user "username:password" -v -i -X DELETE https://yourDomain.com/cticache/DNIS-ANI/5551234568:1234567890


HTTP/1.1 200 OK
< X-Powered-By: Express
X-Powered-By: Express
< Content-Type: application/json; charset=utf-8
Content-Type: application/json; charset=utf-8
< Content-Length: 20
Content-Length: 20
< Date: Mon, 29 Sep 2014 00:26:35 GMT
Date: Mon, 29 Sep 2014 00:26:35 GMT
< Connection: keep-alive
Connection: keep-alive

* Connection #0 to host yourDomain.com left intact
{"value":"12345678"}
Copyright ©1993-2024 Joey E Whelan, All rights reserved.

Sunday, September 21, 2014

VXML and REST Web Services

Summary

I'll be describing how to make REST web service calls from VXML scripts in this post.  In a nutshell, the VXML <data> element can be utilized.  Though per spec, this element only provides support for XML input and output - many VXML browsers today provide support for more efficient encoding schemes, such as JSON.

REST POST then Transfer 

Main script

 1
 2
 3
 4
 5
 6
 7
 8
 9
10
11
12
13
14
15
16
17
18
19
20
21
22
23
24
25
26
27
28
29
30
31
32
33
34
35
36
37
38
39
40
41
42
43
<?xml version="1.0" encoding="UTF-8"?>
<!-- 
 Author: Joey Whelan
 Simple VXML script to illustrate REST calls.  Script receives an inbound call then makes a
 subdialog call.  The subdialog handles the execution of the REST (HTTP POST) call.  
 The returned value from that POST is used as input to a blind transfer.
 -->
 
<vxml version="2.1">
 <form>
  <var name="value" expr="87654321" />
  
  <subdialog name="results" src="cticacheSubD.vxml">
   <param name="srcURI" expr="'https://username:password@yourDomain.com/cticache/DNIS-ANI/'" />
   <param name="methodType" expr="'post'" />
   <param name="val" expr="value"/>
   
   <filled>
    <if cond="results.respObj.error != undefined" >
     <prompt>
      <value expr="results.respObj.error"/>
     </prompt>
     <exit/>
    <else/>
     <assign name="target" expr="results.respObj.dnis"/>
     <goto next="#transfer"/> 
    </if>
   </filled>
  </subdialog> 
 </form>

 <form id="transfer">
  <transfer type="blind" destexpr="'tel:' +target">
   <prompt>
    Transferring this call to 
    <say-as interpret-as="digits">
     <value expr="target"/>
    </say-as>
   </prompt>
  </transfer>
 </form>

</vxml>

Lines 13-16  

A call is made to a subdialog which handles the REST transaction.  The input parameters to that subdialog are the URI of the REST service, the HTTP method to be used, and an input value to the service.

Regarding the URI parameter - HTTP Basic Authentication can be utilized with the <data> element by passing the username + password as part of the URI ('client:password' below).  Combining basic auth with TLS (as below) provides a modicum of security for the REST service.  The authentication credentials will be encrypted under TLS.

1
   <param name="srcURI" expr="'https://username:password@yourDomain.com/cticache/DNIS-ANI/'" />

Lines 18-28

Results of the subdialog are passed back as a JSON object.  I check to see if an error occurred as a result the REST call.  If so, I simply play out the error as TTS.  If the call was successful, I set a variable ('target') to the value of the results and then goto a form that will perform a call transfer.

Lines 32-41

This form takes the REST call result (a dialable number) and performs a blind transfer to that number.

REST Subdialog

  1
  2
  3
  4
  5
  6
  7
  8
  9
 10
 11
 12
 13
 14
 15
 16
 17
 18
 19
 20
 21
 22
 23
 24
 25
 26
 27
 28
 29
 30
 31
 32
 33
 34
 35
 36
 37
 38
 39
 40
 41
 42
 43
 44
 45
 46
 47
 48
 49
 50
 51
 52
 53
 54
 55
 56
 57
 58
 59
 60
 61
 62
 63
 64
 65
 66
 67
 68
 69
 70
 71
 72
 73
 74
 75
 76
 77
 78
 79
 80
 81
 82
 83
 84
 85
 86
 87
 88
 89
 90
 91
 92
 93
 94
 95
 96
 97
 98
 99
100
101
102
103
104
105
106
107
108
109
110
111
112
113
114
115
<?xml version="1.0" encoding="UTF-8"?>
<!-- 
 Author: Joey Whelan
 Subdialog for making REST web service calls.  It is parameterized to provide flexibility on URI and 
 method types.
 -->
 
<vxml version="2.1">
 
 <catch event="error.badfetch.https.400 error.badfetch.http.400">
  <log label="Error" expr="'HTTP 400 - Bad Request'"/>
  <prompt>
   This request could not be understood
   <break time="1000"/>
  </prompt>
  <var name="respObj" />
  <script>
    respObj = {'error':'HTTP 400'};
  </script>
  <return namelist="respObj" />
 </catch>
 
 <catch event="error.badfetch.https.401 error.badfetch.http.401">
  <log label="Error" expr="'HTTP 401 - Unauthorized'"/>
  <prompt>
   This request did not have the proper authentication
   <break time="1000"/>
  </prompt>
  <var name="respObj" />
  <script>
    respObj = {'error':'HTTP 401'};
  </script>
  <return namelist="respObj" />
 </catch>
 
 <catch event="error.badfetch.https.403 error.badfetch.http.403">
  <log label="Error" expr="'HTTP 403 - Forbidden'"/>
  <prompt>
   This request can not be fulfilled on this server
   <break time="1000"/>
  </prompt>
  <var name="respObj" />
  <script>
    respObj = {'error':'HTTP 403'};
  </script>
  <return namelist="respObj" />
 </catch>
 
 <catch event="error.badfetch.https.404 error.badfetch.http.404">
  <log expr="'HTTP 404 - Not Found'"/>
  <prompt>
   This request does not match anything on this server
   <break time="1000"/>
  </prompt>
  <var name="respObj" />
  <script>
    respObj = {'error':'HTTP 404'};
  </script>
  <return namelist="respObj" />
 </catch>
 
 
 <catch event="error.badfetch.https.500 error.badfetch.http.500">
  <log label="Error" expr="'HTTP 500 - Internal Server Error'"/>
  <prompt>
   The server has experienced an internal error
   <break time="1000"/>
  </prompt>
  <var name="respObj" />
  <script>
    respObj = {'error':'HTTP 500'};
  </script>
  <return namelist="respObj" />
 </catch>
 
 <form>
  <var name="srcURI" />
  <var name="methodType" />
  <var name="val" />
  
  <block>
   <script>
    methodType = methodType.toLowerCase();
   </script>
   <var name="key" expr="session.calledid + ':' + session.callerid" />
   
   <!-- the ecmaxlmtype="e4x" and <assign name="respObj" ... JSON.parse(...)/> statements are hacks for the VXML
   browser I'm using.  It has 'challenges' with application/json input parameters.  If your browser supports JSON 
   input natively these statements are unnecessary
    -->
   <if cond="methodType == 'delete'">
    <data name="response" srcexpr="srcURI + key" ecmaxmltype="e4x" method="delete"/>
    <assign name="respObj" expr="JSON.parse(response.toString())"/>
    <return namelist="respObj" />  
   </if>

   <if cond="methodType == 'get'">
    <data name="response" srcexpr="srcURI + key" ecmaxmltype="e4x" method="get"/>
    <assign name="respObj" expr="JSON.parse(response.toString())"/>
    <return namelist="respObj" />  
   </if>
   
   <!--  Similar browser 'challenge' with JSON here, except now with output (enctype).
   If your browser supports JSON natively - change enctype to "application/json"
    -->
   <if cond="methodType == 'post'">
    <var name="ani" expr="session.callerid" />
    <var name="value" expr="val"/>
    <data name="response" srcexpr="srcURI" ecmaxmltype="e4x" enctype="application/x-www-form-urlencoded" method="post" namelist="ani value"/>
    <assign name="respObj" expr="JSON.parse(response.toString())"/>
    <return namelist="respObj" />  
   </if> 
  </block>
 </form>
</vxml>

Lines 10-74

This is a series of <catch> blocks for the various HTTP error codes this particular REST service can throw.  In all cases here I'm setting the result to an object, playing an error prompt, then returning from the subdialog with that error object.

Lines 77-79

Input parameters for this subdialog.

Line 85

Here I'm setting a variable to the dialed number and caller ID.  This stored as a string delimited with a colon.

Lines 91-112

This is the main code of the subdialog.  <if> blocks determine which HTTP method is used.  The URI of the REST service is appended with the DNIS:ANI value from Line 85.  The REST result is returned from the subdialog as a JSON object.

REST DELETE (Fetch)

The VXML code below implements the analog of the previous script (which POSTed data).  The code below fetches that POSTed data and deletes it.

Main Script

 1
 2
 3
 4
 5
 6
 7
 8
 9
10
11
12
13
14
15
16
17
18
19
20
21
22
23
24
25
26
27
28
29
30
<?xml version="1.0" encoding="UTF-8"?>
<!-- 
 Author: Joey Whelan
 Simple VXML script to illustrate REST calls.  Script makes a fetch (implemented as a HTTP DELETE) to
 a REST service.
 -->
<vxml version="2.1">
 <form>
   <subdialog name="results" src="cticacheSubD.vxml">
    <param name="srcURI" expr="'https://username:password@yourDomain.com/cticache/DNIS-ANI/'" />
    <param name="methodType" expr="'delete'" />
   
    
   <filled>
    <if cond="results.respObj.error != undefined" >
     <prompt>
      <value expr="results.respObj.error"/>
     </prompt>
    <else/>
     <prompt>
      The account number is
      <say-as interpret-as="digits">
       <value expr="results.respObj.value"/>
      </say-as>
     </prompt>
    </if>
   </filled>
  </subdialog> 
 </form>
</vxml>

Lines 9-11

Similar to the previous <form>, the REST-handling subdialog is called with the appropriate input parameters.  The method type is set to 'delete'.

Line 14-27

The results of the subdialog are inspected.  If an error occurred, its message is played back as TTS.  If the call was successful, the result value is played back as TTS.


Copyright ©1993-2024 Joey E Whelan, All rights reserved.

REST calls from Genesys Routing Strategies

Summary

This article is a continuation of my previous discussion regarding web service access from Genesys strategies.  In that article, I described how to access traditional/SOAP-based web services from Genesys Interaction Routing Designer(IRD)-created routing strategies.  For this article, I show how to access REST-ful web service implementations with IRD strategies.

HTTP Post Implementation

Figure 1 depicts a simplistic/non-production ready strategy that executes a HTTP POST call with a JSON parameter.  The web service returns a phone number that the strategy subsequently uses as a transfer target.

Figure 1

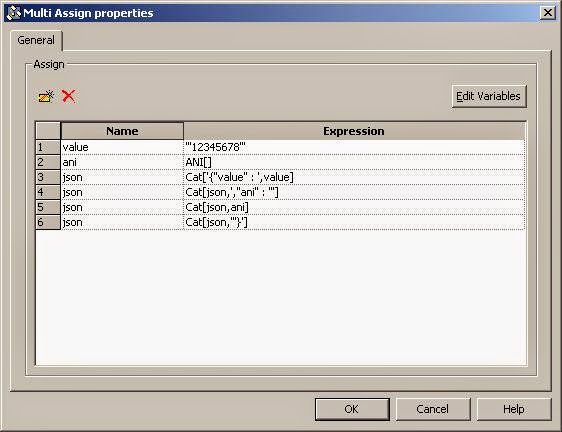
In Figure 2 I'm using a Multi-assign object to build up a JSON-formatted string that will be used as an input parameter to the POST call.  The resultant string looks like this:

{ "value" : '12345678', "ani" : '<the actual ANI of the inbound call to this strategy>' }

That string is assigned to a Genesys variable named 'json'.
Figure 2

Figure 3 shows the General Tab of the IRD web service object.  Here I'm setting up a HTTP POST call to a SSL-based REST service.  I explained how to configure Universal Routing Server (URS) for SSL access in this post.  The input parameter of this HTTP call will be sent as an application/json content type in the request body.

Figure 3

The Security tab of the web service object is depicted in Figure 4.  This tab sets up HTTP Basic Authentication for this POST call.  In this type of authentication credentials are passed in clear text, hence, by itself, basic authentication is inherently insecure.   However, combining basic auth with HTTPS does provide a fairly secure interface.  The authentication credentials are encrypted in TLS.

Figure 4

Finally, Figure 5 shows the Result tab of this web service object.  As was discussed in my previous post, Genesys URS will return the results of a web service call into an IRD List object.

Figure 5

In Figure 6, I pull the first item off this List object and assign it to an IRD variable called 'transferTarget'.  This web service call returns a JSON object with 3 properties.  The value of the first property of this JSON object is a phone number.  That phone number (now in the 'transferTarget' variable) is passed to a TRoute function which initiates a transfer.

Figure 6
As an aside - This strategy is loaded against a Genesys SIP Server (SIPS) route point.  You'll notice I have a "Silence" treatment object as the first object in this strategy.  That object is there to cause an 'answer' of the inbound call.  By answering the call (with either Genesys Media Server or Stream Manager), this subsequent transfer is implemented by SIPS as a SIP REFER.  If the call is never answered in the strategy (meaning no voice treatment of any sort), the transfer from the strategy is implemented as a re-INVITE, which keeps SIPS in the signalling path for the duration of the call - or - a 302 Moved, which is rejected by my SIP trunk service provider.  A REFER transfer takes SIPS out of the signalling path.  Whether a Re-INVITE or REFER/302 is initiated on the transfer is determined by how the oosp-transfer-enabled and refer-enable options are set on the Genesys trunk object used for the outbound transfer.

HTTP Delete Implementation

Figure 7 depicts a simple IRD strategy for illustrating a REST Delete operation.  This strategy accepts a call transferred from 3rd Party IVR, CTI framework, etc.  Based on ANI and DNIS, the strategy performs a fetch of the data associated with the call that was stored by the 3rd Party system.  The fetch is implemented as an HTTP Delete.  The Delete returns the data associated with the call and clears that data item from storage.

Figure 7
The first IRD object in this strategy (Multi-Assign) is depicted in Figure 8.  Here I'm building up a URL to the REST interface using string concats of the DNIS and ANI values of the inbound call.

Figure 8

The IRD Web Service object is shown in Figure 9.  The 'Web Service URL' parameter is set to the URL I built up in the previous step.  The 'Method' is set to DELETE.  Otherwise, this object is configured identically to the previous (Figure 3).

Figure 9

The remainder of this strategy is straight-forward.  The value fetched from the REST call is attached and then the call is routed to a skill.  The agent receives a screen-pop with that attached data item. Copyright ©1993-2024 Joey E Whelan, All rights reserved.

Sunday, September 14, 2014

CA-signed SSL Certificates with Node

Summary

I just recently went through the exercise of bringing up a Node HTTPS server with 'real' SSL credentials (meaning, not a self-signed certificate).  Although there's a lot of bits and pieces of info out there on the Interweb on how to obtain a CA-signed certificate, configure Node HTTPS, etc - I couldn't find a concise guide in any one place on how to do a real-world SSL implementation with Node.  Below is an attempt to provide clear guidance and hopefully save you some time if you ever have to configure this.

Step 1:  Generate a CSR
Below is the openSSL command to create a 2048-bit private key and certificate signing request (CSR - that will contain the corresponding public key).  That command will generate a series of questions for info required in a CSR. At a minimum, you'll need to provide a legitimate Common Name (a domain name you control) and email address.
openssl req -nodes -newkey rsa:2048 -keyout yourPrivate.key -out yourServer.csr


Step 2:  Submit the CSR to CA
I went with Comodo as my CA for this exercise.  They currently provide a 90-day free SSL certificate.  Additionally, I thought their cert request process was well-documented and easy to use. That request process amounted to a copy/paste of the text of the CSR to their web form and then proof that I actually controlled the domain in question.  That can be accomplished in multiple ways (email to the domain, CNAME mods, etc).  After Comodo has that proof, they'll send an email to you with a zip archive containing the following files:

  1. Certificate file.  Example:  yourDomain_com.crt
  2. Certificate chain file.  Example:  yourDomain_com.ca-bundle
Step 3:  Combine SSL Credentials into a PKCS #12 file
This is the part that took some time and digging to figure out.  Simply putting the credentials you've created/received into the HTTPS options on the createServer call doesn't cut it.  The problem is with that chain file.  It needs to be passed as an array for the 'ca' option.  That doesn't happen with just a fs.read.  You wind up with SSL errors when a client attempts to connect to a server with this config.


//WILL NOT WORK
var privateKey = fs.readFileSync('/path/to/yourPrivate.key');
var certificate = fs.readFileSync('/path/to/yourDomain_com.crt');
var certAuth = fs.readFileSync('/path/to/yourDomain_com.ca-bundle');
var credentials = {key: privateKey, cert: certificate, ca: certAuth};

var appHttps = express();
var httpsServer = https.createServer(credentials, appHttps).listen(yourHttpsPort);


Folks have written some examples on how to parse out that chain file into an array that Node can digest, but I ran across a post with a the better idea of just combining all three files into one PKCS file with the openSSL command below:

openssl pkcs12 -export -out yourDomain.com.pfx -inkey yourPrivate.key -in yourDomain_com.crt -certfile yourDomain_com.ca-bundle


Now, you can do the following:


//THIS WORKS
var pfxFile = fsys.readFileSync('/path/to/yourDomain.com.pfx');
var credentials = {pfx: pfxFile};
var appHttps = express();
var httpsServer = https.createServer(credentials, appHttps).listen(yourHttpsPort);
Copyright ©1993-2024 Joey E Whelan, All rights reserved.

Saturday, September 13, 2014

Enabling SSL for Genesys URS/HTTP Bridge

Summary

In this post I'm going to show how to get the Genesys Universal Routing Server (URS) HTTP Bridge capable of handling SSL connections.  The bridge is used to enable traditional Genesys routing strategies to access external SOAP or REST web services.  SSL integration is not well-documented in the product docs, so I'll save you some of my pain here (Linux deployment).


Environmentals

Firstly, you need to install the Genesys "Security Pack."  That software bundle isn't included with URS, but has the SSL libraries necessary for URS to access HTTPS-based web services.  After it is installed, you need to ensure the URS process has its LD_LIBRARY_PATH variable set to the directory where you put the Security Pack.  I made a shell script for starting up URS and added this command to it:

export LD_LIBRARY_PATH=$LD_LIBRARY_PATH:/opt/genesys/secpack

Now that URS can find its SSL libraries, now you need to tell it where to find its Certificate Authority (CA).  Interestingly enough, the product will actually trust a self-generated CA.  In any case, you have to set a URS configuration option that tells it where to go for that CA file.  Below is a screen-shot of the config option that needs to be set (def_trusted_ca).

Figure 1

And that's it.  Assuming you have a valid CA file, you should be able access HTTPS web services from a Genesys routing strategy with the above mods.
Copyright ©1993-2024 Joey E Whelan, All rights reserved.
Tuesday, August 19, 2014

Synchronization Constructs with Node + Redis

Summary

In this article I'll be describing how to create the following basic synchronization objects using a combination of Node and Redis:  semaphores, mutex locks, condition variables, and by a combination of locks and conditions - monitors.  I'll also include implementations of these objects in two classic computer science problems in concurrency.

Implementation of the Synchronization Objects

Given Node is a single-threaded architecture, the question arises - Why would I ever need to worry about concurrent programming problems like critical sections, mutual exclusion, synchronization, etc? Well, even if your code only involves one process, the asynchronous nature of Node can lead to situations where a shared object is being accessed in a non-coherent manner, i.e. race conditions.

There are no shared variables/memory in Node applications.  That includes even those apps with multiple processes utilizing the 'cluster' feature of Node.  That leads to use of objects external to Node to implement mutual exclusion and synchronization.  For this exercise, I used Redis.

Figure 1 depicts the overall approach I used.


Figure 1
Figure 2 depicts an overview of the Javascript object structure.

Figure 2
Synchronization Object Code Snippets

SyncConstruct - constructor
The constructor for this object creates Redis clients for command execution and subscription.  A callback map is also allocated to save callbacks for a waiting process.  A waiting process is 'awakened' when its Redis subscriber receives a message indicating it can proceed.  Its callback is fetched from the map and executed.

function syncConstruct(key, func)
{
    logger.debug('Entering - File: syncConstruct.js, Method: syncConstruct, key:%s', key);
    if (key && func)
    {
        var self = this;
        self.key = key;
        self.cbMap = {};  //object map containing the callback functions of processes waiting to execute
        self.client = redis.createClient(properties.redisServer.port, properties.redisServer.host);  //redis command client
        self.subscriber = redis.createClient(properties.redisServer.port, properties.redisServer.host);  //redis subscription client
        var channel = self.key + ':' + os.hostname() + ':' + process.pid;
        
        self.subscriber.subscribe(channel);
        
        
        /*
         * When a process that was queued due to synchronization delay, it is 'signal'ed to resume via a redis publication.  The
         * 'on message' event triggers execution of the delayed process's callback function
         */
        self.subscriber.on('message', function(channel, msg){
            logger.debug('Entering - File: syncConstruct.js, Method: on message, channel: %s, pid: %d', channel, process.pid);
            var cbFunc = self.cbMap.channel;
            delete self.cbMap.channel;
            cbFunc();
            logger.debug('Exiting - File: syncConstruct.js, Method: on message channel: %s, pid: %d', channel, process.pid);
        });
        
        /*
         * Constructor callback is invoked upon receipt of the 'subscribe' event.  
         */
        self.subscriber.on('subscribe', function(channel, count){
            logger.debug('Entering - File: syncConstruct.js, Method: on subscribe, channel: %s, pid: %d', channel, process.pid);
            func();
            logger.debug('Exiting - File: syncConstruct.js, Method: on subscribe, channel: %s, pid: %d', channel, process.pid);
        });
        
    }
    logger.debug('Exiting - File: syncConstruct.js, Method: syncConstruct');
};


SyncConstruct - enter
This provides the base method for critical section entry used by all the inherited objects (semaphore, etc).  This method executes the particular Redis Lua Script for that inherited object.  The process is either allowed to continue or is delayed by placing its callback on the wait queue (implemented as a Redis List object).

syncConstruct.prototype.enter = function(luaScript, callback1, callback2)
{
    
    var self = this;
    var channel = self.key + ':' + os.hostname() + ':' + process.pid;
    logger.debug('Entering - File: syncConstruct.js, Method: enter, channel: %s', channel);
    self.cbMap.channel = callback1;
   
    self.client.eval(luaScript, 2, self.key, self.key + ':WaitQueue', channel, function (err, res){
        if (err)
        {
            throw err;
        }
            
        if (res > 0)  //will never be true for a condition variable wait method call
        {
            logger.debug('File: syncConstruct.js, Method: enter, passed eval script, res: %s, channel: %s, pid: %d', 
                    res, channel, process.pid);
            var func = self.cbMap.channel;
            
            if (func) 
            {
                delete self.cbMap.channel;
                func();
            }
        }
        
        if (callback2)  //covers the case of releasing a monitor lock after a process has been put in the wait queue
            callback2();
    });
    logger.debug('Exiting - File: syncConstruct.js, Method: enter, channel: %s', channel);
};


SyncConstruct - exit
Base method for critical section exit.  It evaluates a Redis Lua script passed as a parameter.  For all inherited objects, that script ensure 'fairness' by choosing an already waiting process as next in queue.  If there are no processes in the wait queue, the synchronization object (Redis key) is updated to reflect the critical section is available.

syncConstruct.prototype.exit = function(luaScript, callback)
{
    var self = this;
    logger.debug('Entering - File: syncConstruct.js, Method: exit, self.key: %s, queue: %s', self.key, self.key+':WaitQueue');
    self.client.eval(luaScript, 2, self.key, self.key + ':WaitQueue', function (err, res){
        if (err)
        {
            throw err;
        }
      
        if (res > 0)  
        {
            if (callback)
                callback();
        }
        else  //covers the case that a message is published but no process received it (process died for example)
        {
            logger.error('***File: syncConstruct.js, Method: exit, no process received published message to %s', self.key+':WaitQueue');
            self.exit(luaScript, callback);
        }
    });
    logger.debug('Exiting - File: syncConstruct.js, Method: exit');
};


Semaphore - script to implement the "P" function
This Lua script is called by an Redis eval method.  The script checks the value of a Redis key.  If that key is greater than 0, it decrements the key and returns the key's previous value (something > 0).  If the key is 0, the process's id is pushed on to a Redis list (wait queue) and 0 is returned.

The decision to allow the process to proceed is based on the return value.  Greater than 0, the process proceeds.  Less than or equal 0, the process delays.

var pScript =  'local s = redis.call(\'get\', KEYS[1])\
                if (s and s + 0 > 0) then \
                    redis.call(\'decr\', KEYS[1]) \
                    return s \
                else \
                    redis.call(\'lpush\',KEYS[2], ARGV[1]) \
                    return 0 \
                end';


Semaphore - script to implement the "V" function
This Lua script checks the Redis list representing the wait queue by popping off the rightmost (oldest) member.  If a process was on that queue, a message is published to its specific channel (which is identified by a concatenation of the key name, machine name, and process id.  If nothing was on the wait queue, the Redis key is simply incremented.

var vScript =  'local pId = redis.call(\'rpop\', KEYS[2]) \
                if (pId) then \
                    return redis.call(\'publish\', pId, \'V\') \
                else \
                    return redis.call(\'incr\', KEYS[1]) \
                end';


Lock - script to implement the "acquire" function
This script fetches the Redis key associated with the lock and checks if it is greater than 0.  If so, the key is decremented and the previous value returned (value greater than 0 which allows the process to proceed).  If not, the process is pushed onto the FIFO wait queue.

var acquireScript =  'local s = redis.call(\'get\', KEYS[1]) \
                      if (s and s + 0 > 0) then \
                         redis.call(\'decr\', KEYS[1]) \
                         return s \
                      else \
                         redis.call(\'lpush\',KEYS[2], ARGV[1]) \
                         return 0 \
                      end';

Lock - script to implement the "release" function
This script checks the wait queue for a waiting process.  If one exists, that process is awakened via a published message.  If not, the Redis key associated with the lock is incremented to at most a value of 1.
var releaseScript =  'local pId = redis.call(\'rpop\', KEYS[2]) \
                     if (pId) then \
                        return redis.call(\'publish\', pId, \'release\') \
                     else \
                        local s = redis.call(\'get\', KEYS[1]) + 0 \
                        if (s and s + 0 < 1) then \
                            return redis.call(\'incr\', KEYS[1]) \
                        else \
                            return 1 \
                        end \
                     end';


Condition - script to implement the "wait" function
For condition variables, the entry procedure is very simple:  the process is put immediately onto the wait queue.

var waitScript = 'redis.call(\'lpush\',KEYS[2], ARGV[1]) \
                  return 0';


Condition - script to implement the "signal" function
Script to implement the signal function is equally simple for condition variables.  The wait queue is 'popped'.  If a process was waiting, a message to proceed to published to it.


var signalScript = 'local pId = redis.call(\'rpop\', KEYS[2]) \
                    if (pId) then \
                       return redis.call(\'publish\', pId, \'signal\') \
                    else \
                       return 1 \
                    end';


Condition - script to implement the "signalAll" function
Nearly identical to the above script.  In this case, the entire wait queue is popped and every waiting process is sent a message to proceed. 


var signalAllScript = 'local pId = redis.call(\'rpop\', KEYS[2]) \
                        while (pId) do \
                            redis.call(\'publish\', pId, \'signalAll\')\
                            pId = redis.call(\'rpop\', KEYS[2]) \
                        end \
                        return 1';


Synchronization Implementation #1 - The Dining Philosophers Problem

Dining Philosophers is a classic synchronization problem in computer science.  The gist of the problem is that multiple processes (Philosophers) are competing for insufficient resources (Forks).  If all processes were to acquire and hold 1 resource at the same time , none would be able to proceed (a Philosopher needs 2 forks to eat). Deadlock occurs, or more precisely for this case - all the Philosophers starve to death.

I implemented the solution to this problem using Semaphores.  Each of the 5 forks becomes a semaphore that each of the 5 philosopher processes perform P and V ops for access synchronization.

Figure 3 depicts the organization of the main process flow of the solution.


Figure 3


Below is a code snippet of that flow above.  Async was used to minimize callback nesting.

    async.series([ function (callback1)
                   {    
                        rightFork = new semaphore(rightForkNum, callback1);
                   },
                   function (callback2)
                   {
                       leftFork = new semaphore(leftForkNum, callback2);
                   },
                   function (callback3)
                   {
                       /*
                        * after semaphores have been created, do 10 iterations of getting forks, eating, and thinking
                        */
                       var iteration = 1;
                       d.run(function() {
                           async.whilst(
                                   function() 
                                   { 
                                       return iteration <= 10;
                                   },
                                   function(callback) 
                                   {
                                       logger.info('Iteration %d, Philosopher %d', iteration, cluster.worker.id);
                                       iteration++;
                                       live(rightFork, leftFork, callback);
                                   },
                                   function (err) 
                                   {
                                       if (err)
                                           throw err;
                                       logger.info('Philosopher %d signing off', cluster.worker.id);
                                       rightFork.quit();
                                       leftFork.quit();
                                       logger.debug('Exiting - File: dining.js, Method: initDomain, Philosopher id:%d', cluster.worker.id);
                                       callback3();
                                   }
                           );
                       });
                   }
                  ],
                  function(err)
                  {
                    if (err)
                        throw err;
                    cluster.worker.disconnect();
                  }
    );


Synchronization Implementation #2 - Readers/Writers Problem

Readers/Writers is yet another classic computer science problem.  For this synchronization problem, we have multiple read and write processes competing for the same resource (file, database, etc).  Multiple readers can access the resource concurrently (if there are no writers accessing), but a writer must have exclusive access.

I implemented this solution utilizing monitors.  I used a lock to ensure mutual exclusion to the monitor state, condition variables for process synchronization, and shared variables (Redis keys) for monitor state.

Figure 4 depicts the main process flow for the reader process.
Figure 4
Figure 5 depicts the main process flow for the writer process.
Figure 5

Below is a code snippet of the reader process.  Again, async is used to keep the callback nesting manageable.

    async.series(
                 [function(callback1)
                  {
                      logger.info('Reader %d attempting to gain read access', process.pid); 
                      var writers = 1;
                      async.whilst(  //loop until read access is available
                              function()
                              {
                                  return writers > 0;
                              },
                              function(cb1)
                              {
                                  mutex.acquire(function() {  //acquire monitor lock
                                      numWriters.get(function(res1) {  //fetch numWriters shared variable
                                          writers = res1;
                                          if (res1 == 0)  // if no writers are active, increment the numReaders shared var and release monitor lock
                                          {
                                              numReaders.incr(function(res2) {
                                                  mutex.release(function(){
                                                      cb1();
                                                  });
                                              }); 
                                          }
                                          else  //writers are active, wait on the okToRead cond var and release monitor lock
                                          {
                                              okToRead.wait(mutex, cb1);
                                          }
                                      });
                                  });
                              },
                              function(err)
                              {  
                                  if (err)
                                      throw err;
                                  callback1();  //writers was 0, reader gained access, exiting loop
                              }
                      );
                  },
                  function(callback2) 
                  {
                      logger.info('Reader %d gained read access', process.pid);
                      var readTime = utilities.randomPause(1,3); //1 to 3 seconds of simulated reading
                      setTimeout(function(){ logger.info('Reader %d finished reading', process.pid); callback2(); }, readTime);
                  },
                  function(callback3) 
                  {
                      logger.info('Reader %d releasing read access', process.pid);
                      mutex.acquire(function(){  //acquire monitor lock for the purpose of releasing a reader
                          numReaders.decr(function(res){  //decrement number of readers
                              if (res == 0)  // if num of readers is 0, signal a waiting writer
                              {
                                  okToWrite.signal(function(){
                                      mutex.release(function(){  //release monitor lock
                                         callback3(); //return
                                      });
                                  });
                              }
                              else  //num readers > 0, so just release the monitor lock and return
                              {  
                                  mutex.release(function(){ callback3();});
                              }
                          });
                      });
                  },
                  function(callback4)
                  {
                      logger.info('Reader %d processing data', process.pid);
                      var processingTime = utilities.randomPause(3,8);  //3 to 8 seconds of simulated data processing time
                      setTimeout(function(){ callback4(); }, processingTime);
                  }
                  ], 
                  function(err)
                  {
                     if (err)
                         throw err;
                     logger.debug('Exiting - File: readersWriters.js, Method: read, Process id:%d', process.pid);
                     readCB();
                  }
             );


Finally, code snippet of the writer process.

    async.series(
            [function(callback1)
             {
                 logger.info('Writer %d attempting to gain write access', process.pid); 
                 var writers = 1;
                 var readers = 1;
                 async.whilst(  //loop until write access is available, meaning - no readers or writers active
                         function()
                         {
                             return readers > 0 || writers > 0;
                         },
                         function(cb1)
                         {
                             mutex.acquire(function() {  //acquire monitor lock
                                 numReaders.get(function(res1){ //fetch numReaders shared variable
                                     readers = res1;
                                     if (res1 == 0)  //if no readers active, check number of writers
                                     {
                                         numWriters.get(function(res2){
                                             writers = res2;
                                             if (res2 == 0)  //if no writers active as well, increment numWriters and release monitor lock
                                             {
                                                 numWriters.incr(function(res3){
                                                     mutex.release(function(){
                                                         cb1();
                                                     });
                                                 });
                                             }
                                             else  //active writers are present, release monitor lock and wait
                                                 okToWrite.wait(mutex, cb1);
                                         });
                                     }
                                     else  //active readers are present, release monitor lock and wait
                                         okToWrite.wait(mutex, cb1);
                                 });
                             });
                         },
                         function(err)
                         {  
                             if (err)
                                 throw err;
                             callback1();  //number of readers and writers was 0, writer gained access, exiting loop
                         }
                 );
             },
             function(callback2) 
             {
                 logger.info('Writer %d gained write access', process.pid);
                 var writeTime = utilities.randomPause(1,3); //1 to 3 seconds of simulated wriing
                 setTimeout(function(){ logger.info('Writer %d finished writing', process.pid); callback2(); }, writeTime);
             },
             function(callback3) 
             {
                 logger.info('Writer %d releasing write access', process.pid);
                 mutex.acquire(function(){  //acquire monitor lock for the purpose of releasing a writer
                     numWriters.decr(function(res){  //decrement number of writers
                         okToWrite.signal(function(){  //signal 1 waiting writer
                             okToRead.signalAll(function(){  //signal all waiting readers
                                 mutex.release(function(){
                                     callback3();
                                 });
                             });
                         });
                     });    
                 });
             },
             function(callback4)
             {
                 logger.info('Writer %d processing data', process.pid);
                 var processingTime = utilities.randomPause(3,8);  //3 to 8 seconds of simulated data processing time
                 setTimeout(function(){ callback4(); }, processingTime);
             }], 
             function(err)
             {
                if (err)
                    throw err;
                logger.debug('Exiting - File: readersWriters.js, Method: write, Process id:%d', process.pid);
                writeCB();
             }
        );
Lessons Learned
  1. Developing process synchronization/mutex objects by hand is non-trivial.
  2. Process synchronization in an asynchronous environment (Node) becomes complex quickly.
  3. Attempting to use Redis publisher/subscriber in conjunction with standard Redis key/value objects is prone to race conditions if not carefully thought through.

Full Source Code here.
Copyright ©1993-2024 Joey E Whelan, All rights reserved.