Monday, May 30, 2022

RedisJSON - CRUD Ops

Summary

I cover a shopping cart application use case in this post.  I implement a full CRUD set for the users, products, and carts using the RedisJSON module.
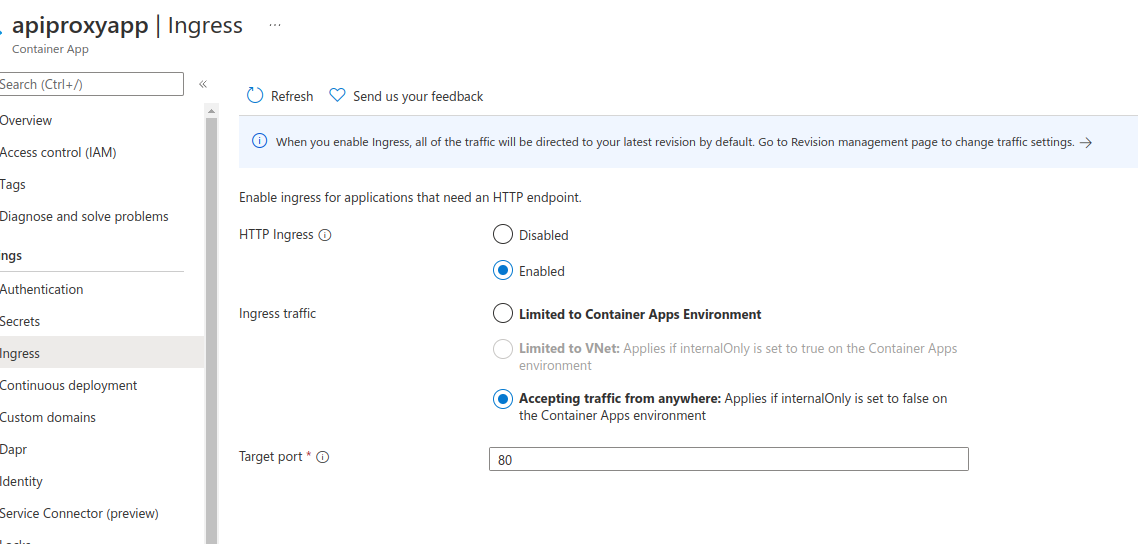
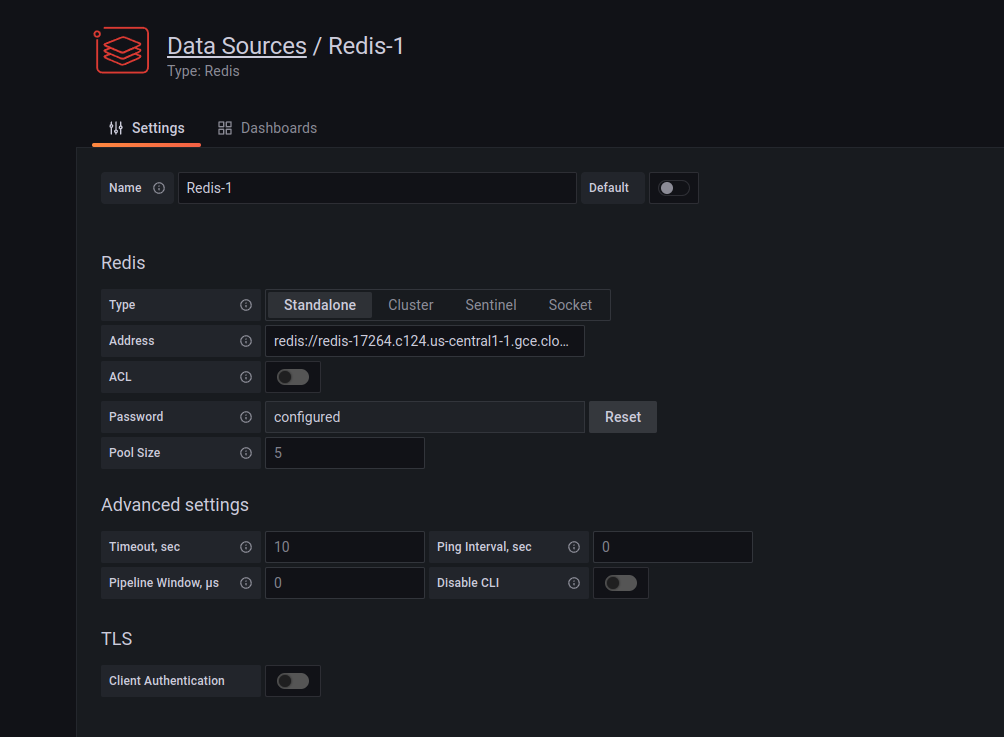
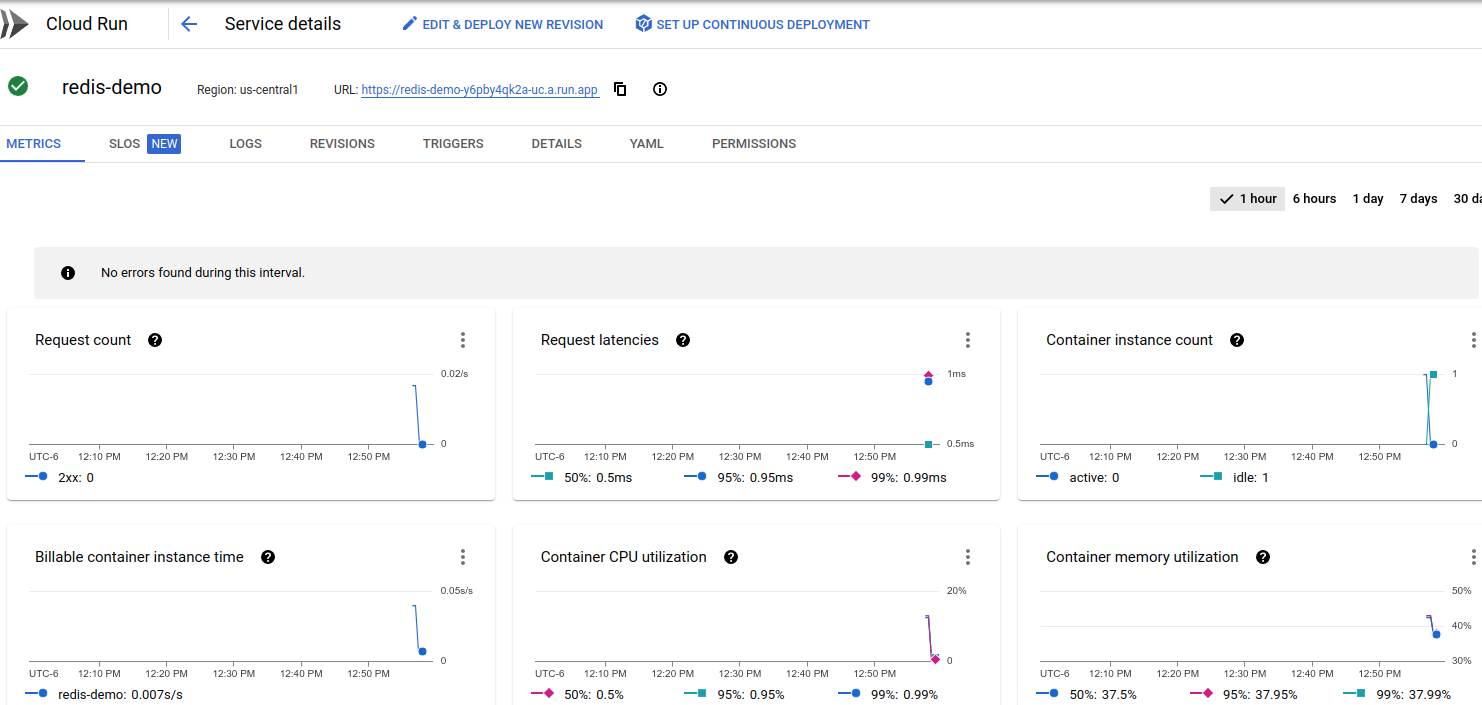
Architecture

The Server-side is implemented as an Express.js app with the node-redis module.  The test client is also Node-based with node-fetch used for the HTTP client and a random data generator I concocted with the uniqueNamesGenerator module.


Code Snippets

Random Data Generation

    static generateUser() {
        return {
            "userID": uuidv4(),
            "lastName":  RandomData.#getLastName(),
            "firstName": RandomData.#getFirstName(),
            "street": RandomData.#getStreet(),
            "city": RandomData.#getCity(),
            "state": RandomData.#getState(),
            "zip": RandomData.#getZip()    
        };
    };
    
    static #getFirstName() {
        return uniqueNamesGenerator({
            dictionaries:[names],
            length: 1
        });
    };

    static #getLastName() {
        return uniqueNamesGenerator({
            dictionaries: [adjectives],
            length: 1,
            style: 'capital'
        });
    };


Create User - Client-side

async function createUser(dbType, user) {
    const response = await fetch(`${SERVER.url}/${dbType}/user`, {
        method: 'POST',
        body: JSON.stringify(user),
        headers: {
            'Content-Type': 'application/json',
            'Authorization': AUTH
        }
    });
    return await response.json();
};

const user = RandomData.generateUser();
res = await createUser('redis', user);


Update Cart - Server-side

app.patch('/:dbType/cart/:cartID', async (req, res) => {
    switch (req.params.dbType) {
        case 'redis':
            try {
                var client = await redisConnect();
                const updatedItem = req.body;
                const items = await client.json.get(`cart:${req.params.cartID}`, {path:'.items'}); 
                const newItems = [];
                let found = false
                for (let item of items) {
                    if (updatedItem.sku == item.sku) {
                        found = true;
                        if (updatedItem.quantity == 0) {
                            continue;
                        }
                        else {
                            newItems.push(updatedItem)
                        }
                        break;
                    }
                    else {
                        newItems.push(item);
                    }
                }
                if (!found) {
                    newItems.push(updatedItem)
                }           
                const val = await client.json.set(`cart:${req.params.cartID}`, `.items`, newItems);

                if (val == 'OK') {
                    console.log(`200: Cart ${req.params.cartID} updated`);
                    res.status(200).json({'cartID': req.params.cartID});
                }
                else {
                    throw new Error(`Cart ${req.params.sku} not fully updated`);
                }
            }
            catch (err) {
                console.error(`400: ${err.message}`);
                res.status(400).json({error: err.message});
            }
            finally {
                await client.quit();
            };
            break;
        default:
            const msg = 'Unknown DB Type';
            console.error(`400: ${msg}`);
            res.status(400).json({error: msg});
            break;
    };
});


Source


Copyright ©1993-2024 Joey E Whelan, All rights reserved.

Saturday, May 21, 2022

Azure Container Apps

Summary

This is a continuation of a previous post on proxying a SOAP API to REST.  In this post, I'll deploy the containerized proxy to Azure Container Apps and front end it with Azure API Management (APIM).

Architecture


Code

Proxy App

I modified the Python FastAPI app slightly to serve up an OpenAPI file.  That file is used by APIM during provisioning.

from fastapi import FastAPI, HTTPException
from fastapi.responses import FileResponse
from zeep import Client
import logging

logging.getLogger('zeep').setLevel(logging.ERROR)
client = Client('https://www.w3schools.com/xml/tempconvert.asmx?wsdl')
app = FastAPI()

@app.get("/openapi.yml")
async def openapi():
    return FileResponse("openapi.yml")

@app.get("/CelsiusToFahrenheit")
async def celsiusToFahrenheit(temp: int): 
    try:
        soapResponse = client.service.CelsiusToFahrenheit(temp)
        fahrenheit = int(round(float(soapResponse),0))
    except:
        raise HTTPException(status_code=400, detail="SOAP request error")
    else:
        return {"temp": fahrenheit}


@app.get("/FahrenheitToCelsius")
async def fahrenheitToCelsius(temp: int): 
    try:
        soapResponse = client.service.FahrenheitToCelsius(temp)
        celsius = int(round(float(soapResponse),0))
    except:
        raise HTTPException(status_code=400, detail="SOAP request error")
    else:
        return {"temp": celsius}

OpenAPI Spec


swagger: '2.0'
info:
  title: apiproxy
  description: REST to SOAP proxy
  version: 1.0.0
schemes:
  - http
produces:
  - application/json
paths:
  /CelsiusToFahrenheit:
    get:
      summary: Convert celsius temp to fahrenheit
      parameters:
        - name: temp
          in: path
          required: true
          type: integer
      responses:
        '200':
          description: converted temp
          schema: 
            type: object
            properties:
              temp:
                type: integer
        '400':
          description: General error
  /FahrenheitToCelsius:
    get:
      summary: Convert fahrenheit temp to celsius
      parameters:
        - name: temp
          in: path
          required: true
          type: integer
      responses:
        '200':
          description: converted temp
          schema: 
            type: object
            properties:
              temp:
                type: integer
        '400':
          description: General error

Deployment


Create + Configure Azure Container Registry


Visual Studio Code - Build Image in Azure


Create + Configure Azure Container App


Execution

Deploy and Test Container App in APIM


Copyright ©1993-2024 Joey E Whelan, All rights reserved.

Sunday, May 15, 2022

RedisTimeSeries

Summary

I'll be covering an IoT data feed use case in this post.  That data feed originates from a Tempest weather station and is stored on a Redis instance as TimeSeries data.  The application is implemented as a container on Google Cloud Run.  The Redis TimeSeries data is visualized using Grafana.

Architecture


Application


ExpressJS REST API Server

Very simple server-side app to start and stop the data flow.
app.post('/start', async (req, res) => {
    try {
        if (!tc) {
            tc = new TempestClient();
            await tc.start();
            res.status(201).json({'message': 'success'});
        }
        else {
            throw new Error('tempest client already instantiated');
        }
    }
    catch (err) {
        res.status(400).json({error: err.message})
    };
});

app.post('/stop', async (req, res) => {
    try {
        if (tc) {
            await tc.stop();
            tc = null;
            res.status(201).json({'message': 'success'});
        }
        else {
            throw new Error('tempest client does not exist');    
        }
    }
    catch (err) {
        res.status(400).json({error: err.message})
    };
});

Tempest Client

Weatherflow provides a published REST and Websocket API.  In this case, I used their Websocket interface to provide a 3-second feed of wind data from the weather station.

    async start() {
        if (!this.ts && !this.ws) {
            this.ts = new TimeSeriesClient(redis.user, redis.password, redis.url);
            await this.ts.connect();
            this.ws = new WebSocket(`${tempest.url}?token=${tempest.password}`);

            this.ws.on('open', () => {
                console.log('Websocket opened');
                this.ws.send(JSON.stringify(this.wsRequest));
            });
        
            this.ws.on('message', async (data) => {
                const obj = JSON.parse(data);
                if ("ob" in obj) {
                    const time = Date.now()
                    const speed = Number(obj.ob[1] * MS_TO_MPH).toFixed(1);
                    const direction = obj.ob[2];
                    console.log(`time: ${time} speed: ${speed} direction: ${direction}`);
                    await this.ts.update(tempest.deviceId, time, speed, direction);                
                }
             });

            this.ws.on('close', async () => {
                console.log('Websocket closed')
                await this.ts.quit();
                this.ts = null;
                this.ws = null;
            });

            this.ws.on('error', async (err) => {
                await this.ts.quit();
                this.ws.close();
                this.ts = null;
                this.ws = null;
                console.error('ws err: ' + err);
            });
        }
    }

    async stop() {
        this.ws.close();
    }

Redis TimeSeries Client

I used the Node-Redis client to implement a function that performs a TimeSeries Add.  
    async update(deviceId, time, speed, direction) {
        await this.client.ts.add(`wind_direction:${deviceId}`, time, direction);
        await this.client.ts.add(`wind_speed:${deviceId}`, time, speed);
    }

Deployment

Dockerfile


FROM node:18-slim
WORKDIR /usr/src/app
COPY package*.json ./
RUN npm install
COPY . .
EXPOSE 8080
CMD ["npm", "start"]

Redis Cloud + Insight


Google Cloud Code Integration with VS Code

The app container is deployed to Cloud Run using the Cloud Code tools.


Grafana Data Connection to Redis


Execution

CURL POST To Start Data Flow


curl -X POST https://redis-demo-y6pby4qk2a-uc.a.run.app/start -u yourUser:yourPassword

Redis Insight Real-time Feed


Cloud Run Console


Grafana Dashboard


Source


Copyright ©1993-2024 Joey E Whelan, All rights reserved.

Stable Marriage Problem - Python

 Summary

This short post covers a Python implementation of the Gale-Shapely algorithm for the Stable Marriage Problem (SMP).  Stable matching is a well-studied problem in multiple fields.  It has applications in nearly any two-sided market scenario.

Code Snippets

Preference Generator

Below is a Python function to generate a random set of preferences for two classes.  Those preferences are then subsequently used by Gale-Shapley to determine a stable matching.
def generate_prefs(class1, class2):
    if len(class1) != len(class2):
        raise Exception("Invalid input: unequal list sizes")

    prefs = {}
    for item in class1:
        random.shuffle(class2)
        prefs[item] = class2.copy()
    
    for item in class2:
        random.shuffle(class1)
        prefs[item] = class1.copy()

    return dict(sorted(prefs.items()))

Gale-Shapley

def gale_shapley(prefs, proposers):
    matches = []
    while len(proposers) > 0:  #terminating condition - all proposers are matched
        proposer = proposers.pop(0)  #Each round - proposer is popped from the free list
        proposee = prefs[proposer].pop(0)  #Each round - the proposer's top preference is popped
        matchLen= len(matches)
        found = False
        
        for index in range(matchLen):  
            match = matches[index]
            if proposee in match:  #proposee is already matched
                found = True
                temp = match.copy()
                temp.remove(proposee)
                matchee = temp.pop()
                if prefs[proposee].index(proposer) < prefs[proposee].index(matchee):  #proposer is a higher preference 
                    matches.remove(match)  #remove old match
                    matches.append([proposer, proposee])  #create new match with proposer
                    proposers.append(matchee)  #add the previous proposer to the free list of proposers
                else:
                    proposers.append(proposer)  #proposer wasn't a higher prefence, so gets put back on free list
                break
            else:
                continue
        if not found:  #proposee was not previously matched so is automatically matched to proposer
            matches.append([proposer, proposee])
        else:
            continue
    return matches

Output

Below is a sample run with two three-member classes: (a1, a2, a3) and (b1, b2, b3).
Preferences
{'a1': ['b2', 'b3', 'b1'],
 'a2': ['b3', 'b2', 'b1'],
 'a3': ['b1', 'b2', 'b3'],
 'b1': ['a2', 'a1', 'a3'],
 'b2': ['a1', 'a3', 'a2'],
 'b3': ['a3', 'a1', 'a2']}

Matches
[['a3', 'b1'], ['a1', 'b2'], ['a2', 'b3']]

Source


Copyright ©1993-2024 Joey E Whelan, All rights reserved.