Saturday, August 29, 2020

Mutual TLS Authentication


Summary

This post will cover the mutual TLS/client-side certificate approach to API authentication.  This is an authentication scheme that's suitable for machine to machine authentication of a limited number of clients.  I'll demonstrate the approach with Node.js implementations of the server and client using self-signed certificates.

Message Flow

Diagram  below depicting the message exchanges (from a CURL session) for a mutual TLS authentication.


Generating Self-Signed Certs

Below is a sequence of OpenSSL commands to generate the server-side private key and self-signed public certificate, the client-side private key and certificate signing request, and finally client-side certificate signing by the server-side cert.

#generate server private key and cert
openssl req -x509 -newkey rsa:4096 -keyout serverKey.pem -out serverCert.pem -nodes -days 365 -subj "/CN=localhost"

#generate client private key and cert signing request
openssl req -newkey rsa:4096 -keyout clientKey.pem -out clientCsr.pem -nodes -subj "/CN=Client"

#sign client cert
openssl x509 -req -in clientCsr.pem -CA serverCert.pem -CAkey serverKey.pem -out clientCert.pem -set_serial 01 -days 365

Server Snippet

Node.js implementation of a REST server that will request mutual TLS/client-side cert. Highlighted areas are of note for mutual TLS.

const https = require('https');
const express = require('express');
const fs = require('fs');

const port = 8443;
const key = fs.readFileSync('serverKey.pem');
const cert = fs.readFileSync('serverCert.pem');
const options = {
        key: key,
        cert: cert,
        requestCert: true,
        ca: [cert]
};

let kvpStore = {};

const app = express();
app.use(express.json());

//create
app.post('/kvp', (req, res) => {
    const key = req.body.key;
    const value = req.body.value;
    if (key && value) {
        if (key in kvpStore) {
            res.status(400).json({error: 'kvp already exists'});
        }
        else {
            kvpStore[key] = value;
            res.status(201).json({key: key, value: kvpStore[key]});
        }
    } 
    else {
        res.status(400).json({error: 'missing key value pair'});
    }   
});

CURL Client Commands

#CREATE
curl -v -k --key clientKey.pem --cert clientCert.pem -H "Content-Type: application/json" -d '{"key":"1", "value":"abc"}' https://localhost:8443/kvp

#RETRIEVE
curl -v -k --key clientKey.pem --cert clientCert.pem https://localhost:8443/kvp/1

#UPDATE
curl -v -k --key clientKey.pem --cert clientCert.pem -X PUT -H "Content-Type: application/json" -d '{"key":"1", "value":"def"}' https://localhost:8443/kvp

#DELETE
curl -v -k --key clientKey.pem --cert clientCert.pem -X DELETE https://localhost:8443/kvp/1

Client Snippet

Node.js implementation of REST client supporting mutual TLS.  Again, highlighted areas depicting where mutual TLS-specific configuration is necessary.

const https = require('https');
const fs = require('fs');
const fetch = require('node-fetch');

const key = fs.readFileSync('clientKey.pem');
const cert = fs.readFileSync('clientCert.pem');
const options = {
        key: key,
        cert: cert,
        rejectUnauthorized: false
};
const url = 'https://localhost:8443/kvp/';
const tlsAgent = new https.Agent(options)

async function create(kvp) {
    const response = await fetch(url, {
        method: 'POST',
        body: JSON.stringify(kvp),
        headers: {'Content-Type': 'application/json'},
        agent: tlsAgent
    });

    const json = await response.json();
    console.log(`CREATE - ${response.status} ${JSON.stringify(json)}`);
}

Source

https://github.com/joeywhelan/mutualtls

Copyright ©1993-2024 Joey E Whelan, All rights reserved.

Saturday, August 1, 2020

Dialogflow, InContact Chat, BlueJeans Video Chat Integration


Summary

This post is a continuation of this one covering Dialogflow and InContact chat integration.  BlueJeans video chat will be added to that same framework in this post.

Architecture

I use Google's Cloud Storage to host a static website consisting of a simple HTML page with Javascript integrations to Google Cloud Functions.  Those functions provide CORS management and API key hiding for API calls to Dialogflow, InContact, and BlueJeans.


Application Flow


Execution

Screenshots of Client and Agent interfaces during a contrived exchange below.


Copyright ©1993-2024 Joey E Whelan, All rights reserved.

Sunday, July 26, 2020

Salesforce Object Query via REST Call


Summary

This post explains how to execute a Salesforce Object Query Language (SOQL) command from a REST call.  The approach and code here are by no means production grade.  This is simply a method to get testing jump-started.

SFDC-side Set Up

You will need to create a 'Connected App' that can be accessed via a 'password' OAuth grant type.  Instructions for that here.  Screen-shot below of the critical areas that need to be set for the authentication to work correctly.

As mentioned in the Summary, there's little regard for security in the config below.  These settings are just to get things working.  You can lock it down after that.  You would not use a password OAuth grant type in a production setting.


Fetch Access Token

This step was actually the most painful of the entire exercise.  The 'connected app' and HTTP POST have to be configured just right.

function formEncode(data) {
    return Object.keys(data)
    .map(key => encodeURIComponent(key) + '=' + encodeURIComponent(data[key]))
    .join('&');  
}

async function getToken() {
    const body = {
        grant_type: 'password',
        client_id: CLIENT_ID,
        client_secret: CLIENT_SECRET,
        username: USERNAME,
        password: PASSWORD
    };

    const response = await fetch(AUTH_URL, {
        method: 'POST',
        body: formEncode(body),
        headers: {
            'Content-Type': 'application/x-www-form-urlencoded',
            'Accept': 'application/json'
        }
    })
    if (response.ok) {
        const json = await response.json();
        return json.access_token;
    }
    else {
        const msg = `getToken() response status: ${response.status} ${response.statusText}`;
  throw new Error(msg);
    }
}

SOQL Command via REST

Once the access token is obtained, a SOQL command can be URI encoded and sent as a query parameter in a HTTP GET to the URL of your SFDC instance.

async function sendQuery(query, token) {

    const response = await fetch(QUERY_URL + encodeURIComponent(query), {
        method: 'GET',
        headers: {
            'Authorization': 'Bearer ' + token
        }
    })
    if (response.ok) {
        return await response.json();
    }
    else {
        const msg = `sendQuery() response status: ${response.status} ${response.statusText}`;
  throw new Error(msg);
    }

}

Execution

Example of the two functions above being used in a promise chain to execute a SOQL command:
const QUERY='SELECT Name,Phone FROM Account ORDER BY Name';
(() => {
    getToken()
    .then((token) => {
        return sendQuery(QUERY, token);
    })
    .then((data) => {
        console.log(JSON.stringify(data, null, 4));
    })
    .catch((err) => {
        console.error(err);
    });
})();

{
    "totalSize": 12,
    "done": true,
    "records": [
        {
            "attributes": {
                "type": "Account",
                "url": "/services/data/v20.0/sobjects/Account/0013t00001Xq9bnAAB"
            },
            "Name": "Burlington Textiles Corp of America",
            "Phone": "(336) 222-7000"
        },
        {
            "attributes": {
                "type": "Account",
                "url": "/services/data/v20.0/sobjects/Account/0013t00001Xq9bpAAB"
            },
            "Name": "Dickenson plc",
            "Phone": "(785) 241-6200"
        },

Source

https://github.com/joeywhelan/soql

Copyright ©1993-2024 Joey E Whelan, All rights reserved.

Wednesday, June 17, 2020

AWS Connect Chat/Lex Bot - Web Client via API-Gateway, Lambda


Summary

This post is a continuation my previous on the topic web chat client integration to AWS Connect.  In this post, I utilize more of the AWS suite to implement the same chat client.  Specifically, I put together a pure cloud architecture with CloudFront providing CDN services, S3 providing static web hosting, API-Gateway providing REST API call proxying to Lambda, and finally Lambda providing the direct SDK integration with Connect.

Architecture

Below is a diagram depicting what was discussed above.  A static HTML/Javascript site is hosted on S3.  That site is front-ended by CloudFront.  The Javascript client application makes REST calls to API-Gateway which proxies those calls to a Lambda function.  The Lambda function in turn is proxying those calls to the appropriate AWS SDK calls to Connect.


Web Client Architecture

The diagram below depicts the client architecture.  All SDK calls to AWS Connect are abstracted to REST calls into API-Gateway + Lambda.


Code Snippets

Client POST/connect call

 async _connect() {  
  try {
   const body = {
    DisplayName: this.displayName,
    ParticipantToken: this.participantToken
   };
   const response = await fetch(API_URL, {
    method: 'POST',
    headers: {
     'Content-Type': 'application/json'
    },
    body: JSON.stringify(body)
   });
   
   const json = await response.json();
   if (response.ok) {
    this.participantToken = json.ParticipantToken;
    const diff = Math.abs(new Date() - Date.parse(json.Expiration));
    this.refreshTimer = setTimeout(this._connect, diff - 5000); //refresh the websocket
    this.connectionToken = json.ConnectionToken;
    this._subscribe(json.Url);
   }
   else {
    throw new Error(JSON.stringify(json));
   }
  }
  catch(err) {
   console.log(err);
  }
 }

Corresponding Lambda Proxy

exports.handler = async (event) => {
 let resp, body;
 try {
  AWS.config.region = process.env.REGION; 
  AWS.config.credentials = new AWS.Credentials(process.env.ACCESS_KEY_ID, 
   process.env.SECRET_ACCESS_KEY);

  switch (event.path) {
   case '/connectChat': 
    switch (event.httpMethod) {
     case 'POST':
      body = JSON.parse(event.body);
      resp = await connect(body.DisplayName, body.ParticipantToken);
      return {
       headers: {'Access-Control-Allow-Origin': '*'}, 
       statusCode : 200,
       body : JSON.stringify(resp)
      } 
async function connect(displayName, token) {
 let sdk, params, response, participantToken;

 if (token) {
  participantToken = token;
 } 
 else {
  sdk = new AWS.Connect();
  params = {
    ContactFlowId: process.env.FLOW_ID,
    InstanceId: process.env.INSTANCE_ID,
    ParticipantDetails: {DisplayName: displayName}
  };
  response = await sdk.startChatContact(params).promise();
  participantToken = response.ParticipantToken;
 }

 sdk = new AWS.ConnectParticipant();
 params = {
  ParticipantToken: participantToken,
  Type: ['WEBSOCKET', 'CONNECTION_CREDENTIALS']
 };  
 response = await sdk.createParticipantConnection(params).promise();
 const expiration = response.Websocket.ConnectionExpiry;
 const connectionToken = response.ConnectionCredentials.ConnectionToken;
 const url = response.Websocket.Url;

 const retVal = {
  ParticipantToken : participantToken,
  Expiration : expiration,
  ConnectionToken : connectionToken,
  Url : url
 };

 return retVal;
}

Source

https://github.com/joeywhelan/awsConnectAPIGwyClient

Copyright ©1993-2024 Joey E Whelan, All rights reserved.

AWS Connect Chat/Lex Bot - Web Client via SDK


Summary

In this post, I cover development of a demo-grade chat web client against AWS Connect via direct integration with the Javascript SDK.  The Connect application utilizes a Lex chat-bot initially and allows escalation to an agent if self-service is not possible.

The code in this post was an interim step to a full AWS cloud integration that will be covered in a future posting.

Architecture

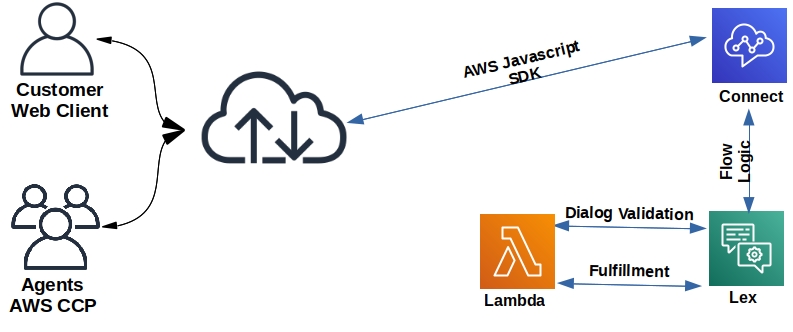
Diagram below of the overall architecture.  The AWS Javascript SDK is utilized for a customer-facing client application.  Agents use the out-of-box Contact Control Panel (CCP) application.  The overall interaction is managed via a AWS Connect flow that calls a Lex bot application.  The Lex bot application provides dialog and fulfillment validations via AWS Lambda function calls.


Call Flow

AWS Connect flow below.  This flow sends a chat interaction into a Lex bot that services intents for either self-service orders for firewood or a request for an agent.  If the agent intent is triggered, the interaction is sent to a queue for an agent.


Lex Bot

AWS Lex console screen-shot below of this simple firewood ordering bot.


AWS SDK Build 

The standard AWS Javascript SDK doesn't include the Connect and ConnectParticipant services, so you have to build your own browser include file.  Below are the steps to do that:

git clone git://github.com/aws/aws-sdk-js
cd aws-sdk-js
npm install
node dist-tools/browser-builder.js connect,connectparticipant > aws-connect.js


Web Client

Diagram and screen-shot below of the client app.  Its composition is a HTML page with vanilla Javascript.  The AWS Connect chat flow has multiple API calls to establish connectivity.  Once connectivity is established, Connect agents/Lex transmit chat messages over a Websocket to the client app.  The client app transmits chat messages via API calls to Connect.


Code Snippets


Main UI Driver

window.addEventListener('DOMContentLoaded', function() {
 const chat = new Chat();
    UIHelper.show(UIHelper.id('start'));
    UIHelper.hide(UIHelper.id('started'));
    UIHelper.id('startButton').onclick = function() {
        chat.start(UIHelper.id('firstName').value, UIHelper.id('lastName').value);
    }.bind(chat);
    UIHelper.id('sendButton').onclick = chat.send.bind(chat);
    UIHelper.id('leaveButton').onclick = chat.leave.bind(chat);
    UIHelper.id('firstName').autocomplete = 'off';
    UIHelper.id('firstName').focus();
    UIHelper.id('lastName').autocomplete = 'off';
    UIHelper.id('phrase').autocomplete = 'off';
    UIHelper.id('phrase').onkeyup = function(e) {
        if (e.keyCode === 13) {
            chat.send();
        }
    }.bind(chat);
        
    window.onunload = function() {
  if (chat) {
   chat.disconnect();
  }
    }.bind(chat); 
});

AWS SDK Driver Snippets

 async start(firstName, lastName) {
  if (!firstName || !lastName) {
   alert('Please enter a first and last name');
   return;
  } 
  else {
   this.firstName = firstName;
   this.lastName = lastName;
   await this._getToken();
   await this._connect();
   UIHelper.displayText('System:', 'Connecting...');
  }
 }

async _connect() {  
  try {
   const connectPart = new AWS.ConnectParticipant();
   const params = {
    ParticipantToken: this.partToken,
    Type: ['WEBSOCKET', 'CONNECTION_CREDENTIALS']
   };  
   const response = await connectPart.createParticipantConnection(params).promise();
   const diff = Math.abs(new Date() - Date.parse(response.Websocket.ConnectionExpiry));
   this.refreshTimer = setTimeout(this._connect, diff - 5000); //refresh the websocket
   this.connToken = response.ConnectionCredentials.ConnectionToken;
   this._subscribe(response.Websocket.Url);
  }
  catch (err) {
   console.log(err);
  }
 }

 async _getToken() {  
  try {
   const connect = new AWS.Connect();
   const partDetails = {
    DisplayName: this.firstName + ' ' + this.lastName
   }
   const params = {
    ContactFlowId: FLOW_ID,
    InstanceId: INSTANCE_ID,
    ParticipantDetails: partDetails
   };
   const response = await connect.startChatContact(params).promise();
   this.partToken = response.ParticipantToken;
  }
  catch (err) {
   console.error(err)
  }
 }

Source

https://github.com/joeywhelan/awsConnectSDKClient

Copyright ©1993-2024 Joey E Whelan, All rights reserved.

Friday, April 10, 2020

NiceIncontact API Authentication


Summary

I've authored several posts on the usage of the NiceIncontact (NiC) APIs, but never covered the authentication steps.  This post will show how to do that for both the legacy and new Userhub configuration interfaces.  I'll show a Typescript implementation of the necessary API calls for both API interfaces.

API Access Keys

Legacy Interface

Below is a screenshot of the legacy admin interface of the 3 pieces of information necessary to generate an API bearer token.


Userhub Interface

The newer Userhub interface requires the two pieces of info below to generate the API bearer token.  This access key has been deleted, so there's no security concern here.


API Authentication Class Design

Below is a diagram depicting the Typescript classes that will be used for generating API bearer tokens for the two access types mentioned above.

Code


Authenticator Interface

export interface Authenticator {
    getToken():Promise<string>;
};

Legacy Nic OAuth Class (getToken function)

    async getToken():Promise<string> {
        let body;
        const username = this.credentials ? this.credentials.username : '';
        const password = this.credentials ? this.credentials.password: '';

        switch (this.grant) {
            case GRANT.CLIENT : {
                body = {
                    'grant_type' : 'client_credentials'
                };
                break;
            };
            case GRANT.PASSWORD : {
                body = {
                    'grant_type' : 'password',
                    'username' : username,  
                    'password' : password
                }
                break;
            };
            default : {
                throw new Error('unknown grant type');
            }
        };

        const response = await fetch(this.tokenURL, {
            method: 'POST',
            headers: {
                'Content-Type' : 'application/json', 
                'Authorization' : 'basic ' + this.key
            },
            body: JSON.stringify(body)
        });
    
        if (response.ok) {
            const json = await response.json();
            return json.access_token;
        }
        else {
            throw new Error(`response status: ${response.status} ${response.statusText}`);
        }
    }

Userhub Access Key Class (getToken function)

    async getToken():Promise<string> {
        const body:object = {
            accessKeyId: this.key,
            accessKeySecret: this.secret
        } 
        const response = await fetch(this.url, {
            method: 'POST',
            headers: {
                'Content-Type' : 'application/json'
            },
            body: JSON.stringify(body)
        });
    
        if (response.ok) {
            const json = await response.json();
            return json.access_token;
        }
        else {
            throw new Error(`getToken() response status: ${response.status} ${response.statusText}`);
        }
    
    }

Demo

async function demo():Promise {
    dotenv.config();
    const app:any = process.env.NIC_APP;
    const vendor:any = process.env.NIC_VENDOR;
    const secret:any = process.env.NIC_SECRET;
    const username:any = process.env.NIC_USERNAME;
    const password:any = process.env.NIC_PASSWORD;
    const accessSecret:any = process.env.NIC_ACCESS_SECRET;
    const accessKey:any = process.env.NIC_ACCESS_KEY;
 
    
    let url:string =  'https://api.incontact.com/InContactAuthorizationServer/Token';
    const clientAuth = new NicOAuth(app, vendor, secret, GRANT.CLIENT, url);
    let token:string = await clientAuth.getToken();
    console.log(`client auth token: ${token}`);
    console.log('');

    const credentials = new Credentials(username, password);
    const passwordAuth = new NicOAuth(app, vendor, secret, GRANT.PASSWORD, url, credentials);
    token = await passwordAuth.getToken();
    console.log(`password auth token: ${token}`);
    console.log('');

    url = 'https://na1.nice-incontact.com/authentication/v1/token/access-key';
    const nicAccess = new NicAccess(accessKey, accessSecret, url);
    token = await nicAccess.getToken();
    console.log(`access token: ${token}`);
}

Results

$ npm run start

> authdemo@1.0.0 start nicapiauth
> node authdemo.js

client auth token: eyJ0eXAiOiJKV1QiLCJhbGciOiJSUzI1NiJ9.eyJpY0JVSWQiOjQ1OTM0NDMsIm5hbWUiOiIiLCJpc3...

password auth token: eyJ0eXAiOiJKV1QiLCJhbGciOiJSUzI1NiJ9.eyJpY0JVSWQiOjQ1OTM...

access token: eyJ0eXAiOiJKV1QiLCJhbGciOiJSUzI1NiJ9.ey...

Source

https://github.com/joeywhelan/NiCAuthentication

Copyright ©1993-2024 Joey E Whelan, All rights reserved.

Sunday, March 29, 2020

Priority Queue with Typescript


Summary

This post covers development of a Priority Queue with Typescript.  The queue is implemented via a Binary Heap.  Typescript features such as static type-checking and object-oriented concepts such as classes, interfaces and inheritance are utilized.

Design

Implementation

Queue Item Class

 export class Item {
    priority:number;
    value:object;

    constructor(priority:number, value:object) {
        this.priority = priority;
        this.value = value;
    }
 }

Heap Interface

import {Item} from './item';

export enum Order {MIN, MAX};
export interface Heap {
    insert(item:Item):void;
    extract():Item;
    peek():Item;
    show():void;
    size():number;
};

Binary Heap Class - snippets

export class BinaryHeap implements Heap {
    private order:Order;
    private heap:Item[];

    insert(item:Item):void {
        this.heap.push(item);
        this.siftUp(this.heap.length-1);
    };

    private siftUp(idx:number):void {
        let parent:number;
        let sorted:boolean = false;

        while (!sorted) {
          parent = this.getParent(idx)
          switch (this.order) {
              case Order.MIN: {
                if (this.heap[idx].priority < this.heap[parent].priority) {
                    this.swap(idx, parent);
                    idx = parent;
                }
                else {
                    sorted = true;
                }
                break;
              }
              case Order.MAX: {
                if (this.heap[idx].priority > this.heap[parent].priority) {
                    this.swap(idx, parent);
                    idx = parent;
                }
                else {
                    sorted = true;
                }
                break;
              }
              default: {
                  sorted = true;
                  break;
              }
          }  
        }
    }

Priority Queue Class

export class PriorityQueue {
    heap:BinaryHeap;

    constructor(items:Item[]){
        this.heap = new BinaryHeap(items);
    }

    insert(item:Item):void {
        this.heap.insert(item);
    }

    isEmpty():boolean {
        return this.heap.size() == 0;
    }

    peek():Item {
        return this.heap.peek();
    }

    pull():Item {
        return this.heap.extract();
    }

    show():void {
        this.heap.show();
    }
}

Example


Source

https://github.com/joeywhelan/PriorityQueue

Copyright ©1993-2024 Joey E Whelan, All rights reserved.